
Desert Camelia


Humble beginnings – take one flower, a desk lamp and some white paper.
Botanical Health Warning: The delicate petals of the flower can be cooked, frazzled or fried by the heat of a tungsten lamp in just a few minutes. Be prepared to work quickly or use soft window light as a low-temperature alternative.

Duplicate the background layer.
Step 1
Duplicate the background layer by dragging the layer to the ‘New Layer’ icon in the layers palette. Don’t worry if the edges of your white paper are in the frame. Just be sure to capture the subject and its shadow.
Note: The surface used does not have to be white, but should be relatively texture-free. This will avoid mismatched textures when the shadow is transported to its new home.

Use the gradient tool in Quick Mask mode.
Step 2
The initial steps in this tutorial aim to reduce the background tone to white and leave the shadows intact. The fall-off of light from the directional light source (the white background gradually becoming grey on the side furthest from the light) can be balanced using an adjustment layer. Select the ‘Default Foreground and Background Colors’, ‘Quick Mask Mode’ and the ‘Gradient Tool’ in the ‘Tools Palette’. Select the ‘Linear Gradient’ and the ‘Foreground to Transparent’, or ‘Foreground to Background’ option in the ‘Options’ bar. Drag a gradient from the brighter side of the image to the darker side of the image. A gradient in the default masking color will appear. Exit Quick Mask mode to reveal the resulting selection.
Alternative approach for Photoshop and Elements users > Adobe Elements users should proceed to the next step and create a gradient directly in the Layer Mask.

Use a levels adjustment layer to balance the background tonality.
Step 3
From the base of the layers palette select a ‘Levels’ adjustment layer. The active selection will create a layer mask for the adjustment layer. Move the central ‘Gamma’ slider and/or highlight slider to the left to brighten the background so that both sides of the background are of a similar tone. Be careful not to loose the shadows in this process. Select ‘OK’ when a satisfactory balance has been achieved.


Select the subject without its shadow. A graphics tablet can help to make light work of this task.
Step 4
Use the painting tools in ‘Quick Mask Mode’ to make a selection of the flower on the background layer (Elements users should use the ‘Selection Brush Tool’ and select the ‘Mask’ mode in the options bar). Remember to feather the selection appropriately or apply a small amount of ‘Gaussian Blur’ to the mask. Click on the layer mask icon in the layers palette to apply a layer mask to the background copy layer (if using Elements the selection can be used to delete the background on this layer).
Note: A graphics tablet can be used to make light work of tricky selections such as the one performed in this demonstration tutorial.

Drag the background copy layer to a position above the levels adjustment layer.
Step 5
Drag the background copy layer to a position above the levels adjustment layer. This will ensure the adjustment layer created in the previous step does not affect your subject.

Use a ‘Threshold’ adjustment layer to render all pixels below the flower black.
Step 6
From the ‘Create new fill or adjustment layer’ menu in the layers palette select ‘Threshold’. This threshold adjustment layer will help in the process of isolating the subtle shadows and enable us to drop the remainder of the background to pure white (255). The first step is to temporarily render all of the pixels below the flower on the top layer black. This is achieved by dragging the slider all the way to the right – a threshold level of 255. Select ‘OK’ to exit the threshold dialog box.
Note: Check the positioning of the layers in the layers palette if your own result does not match that achieved in the tutorial.

Move the Gamma and Highlight sliders to render the grey tones of the background paper white.
Step 7
Move the ‘Gamma’ and ‘Highlight’ sliders to render the grey tones of the background paper white. The shadows should now appear clearly defined. Unless the background is blemish free and very evenly lit not all of the background will be rendered white by this step. Have no fear the whitewash step follows.

Paint out any remaining dark areas that are not part of the subjects shadow.
Step 8
Select the ‘Paintbrush’ in the ‘Tools Palette’ and click on the ‘Switch Foreground and Background Colors’ icon so that White is now the foreground color. Now paint out anything that is not a shadow.
Note: If the thought of painting directly onto the background layer is not something you are comfortable with then either duplicate the background layer again or take comfort in the fact that you already have another ‘unadjusted layer on top’ as your insurance policy.


Import a new background.
Step 9
The threshold layer has now served its purpose and its visibility can be switched off, or the layer deleted by dragging it to the trash icon in the layers palette. When the threshold is removed from the equation the background will appear white and the subtlety of the shadows will reappear. The coast is now clear for the introduction of the new background. Open the new background file and drag its thumbnail from the layers palette into the window of your work-in-progress file. Hold down the Shift key as you let go of the file to centre it in the host canvas. The new background will appear above the modified background layer for the moment.

Link the background layer and its associated adjustment layers to create a ‘clipping’ group.
Step 10
The next step involves moving the old background to a position above the new background. Start by linking the old background layer with its associated adjustment layers (click on the boxes next to the eye icons on each of the layers). Then go to the Layer menu and select ‘Create Clipping Mask From Linked’ command (‘Group Linked’ in Adobe Elements). This action will ensure the new background remains unaffected when the adjustment layers are moved up in the layers palette in the next step.

Rename the background layer and move to a position above the imported background.
Step 11
Double-click the background layer to change its name. When the layer no longer carries the name ‘background’ it can be moved up the layers stack by clicking and dragging it to a position the new background. The linked layers should accompany it on its travels. The new background will momentarily be replaced with the old white background once again.

Adjust the blend modes for the old background layer and the adjustment layers.
Step 12
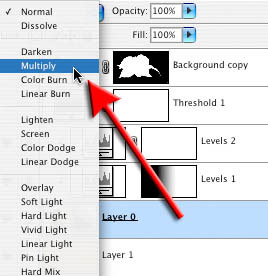
The final step merges or blends the subtle shadows into their new home. Select the old background layer and change its blend mode to Multiply (click on the blend mode menu in the layers palette next to the opacity control). Set the adjustment layers to Luminosity mode if you need to reduce any color that has been introduced from the old background. Add a further Hue/Adjustment layer to this clipping group if additional desaturation is required.

Fade the background and/or create a subtle vignette using adjustment layers and the gradient tool to complete the project.
Step 13
Finishing touches to this project could include the addition of a very subtle vignette, lightening the background as it fades into the distance and the usual sharpening process prior to printing. If an additional adjustment layer gets accidentally grouped with the Clipping group go to the layer menu and select ‘Release Clipping Mask’ command.

Subtle Shadows – courtesy of the shadow catcher technique.
This technique provides those photographers burdened with a meticulous eye a useful way of retaining and transplanting the subtle and complex shadows from the original image to create sophisticated and professional montages.
Shaan Graphics is a premier Image Editing service provider, providing this exclusive glamour retouching service with Internationally lowest price guaranteed. Shaan Graphics Image editing service starts from $0.50 only.
Visit www.shaangraphics.com http://www.shaangraphics.com for more details


No comments:
Post a Comment