In this tutorial, I’ll show you several quick and easy techniques for retouching portraits using Adobe Photoshop.
There are entire books written on retouching portraits—many books in fact. This tutorial does not aim to substitute all that information. Rather than spending a lot of time on many individual steps in retouching photos, this tutorial aims to provide a quick overview of several techniques.
We’ll be working with this photograph:
We won’t focus on theory so much as applying different tools from here on out.
Arrange your workspace
For the most efficient workflow, it may be worth your while to get in the habit of arranging your workspace. Photoshop has many palettes, but we are only going to use the toolbar palette, Layers and the history palette.
You can save your workspace as a preset for quick editing in future jobs.
History log
Go to Edit->Preferences-> Performance and set the history states to 50.This will give you more flexibility as you can go back and see your progress and/or improve any of the techniques you have used.
If you find Photoshop running much slower, revert to your default setting.
Molding Features with Liquify
The Liquify tools are incredibly useful in molding features without destroying too much information. Watch how I apply it do several areas of the model below:
First I open the Liquify panel ( Filter->Liquify ), choose the Forward Warp Tool and use it to push the jaw a bit inward. I repeat this process with the neck. For areas of the models face I want to enlarge, I can use the bloat tool and if I want to reduce the size of something, I can use the pucker tool.
These are the settings I’ve used for the Forward Warp Tool. The brush size can vary of course depending on the region you want to modify.For the jaw region I’ve used a brush size of 238 and for the lips somewhere around 130.However,don’t take these values for granted.
Each photo, and each part of a photo will need careful consideration in tool settings. Since this is a larger photo, we use larger brush sizes.
Cleaning Up Skin with the Clone Stamp
There are many ways to clean skin in Photoshop. Here is a super easy way using the Clone Stamp Tool.
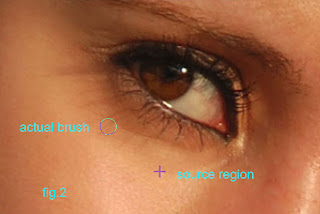
Zoom in to a level where you are comfortable and you can see the details. Now look for a region of skin with a similar color range to the one you want to fix. Usually I choose an area which is close to the part I want to fix ( fig2 ) . Choose the Clone Stamp tool and select the source region (hold alt to select it ) and set the opacity to somewhere around 30%. The key is to use low opacity values but many , many strokes rather than few strokes and a high opacity value. By using this technique , you will preserve the details and not wash out the skin.
I have used the Clone Stamp tool to get rid of the wrinkles , especially those near the corner of the lips and the ones around the bottom part of the eyes. Be careful not to overuse the Clone Stamp tool or else you will lose the skin texture and create flat planes on your face. Fake looking skin is a common error in the practice of retouching photos.
Tip: create snapshots to keep track of your progress and also zoom out often to have an overview of what you have done so far.
Get rid of Wrinkles with the Healing brush
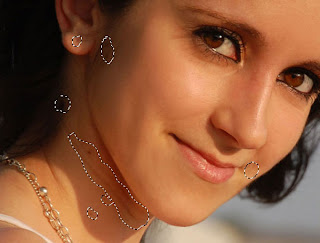
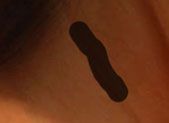
Use the Healing Spot Brush to correct small skin issues like independent blisters or wrinkles. Set the type brush to proximity match for more accurate results.
We’re not going to dive into any theory or arguments over best practices here, but be sure to keep in mind that wrinkles are natural in skin. Don’t get rid of too much.
Quick Tips for Eyes & lips
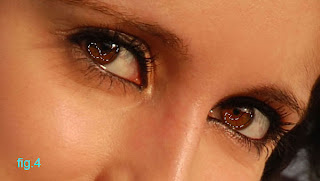
The Dodge and Burn tools are useful in emphasizing the eyes and lips in a portrait. I Select the Dodge tool, set the exposure to 12% and “dodge” the areas indicated in Fig4. This will lighten the colors. To create contrast ( thus we’ll create emphasis on the eyes) we need to use the Burn tool with an exposure of 12%. "Burn" the pupil, the outer part of the iris, the eyelashes and the area under the eyebrows.
Also, I use the Dodge tool to accentuate the highlights from the lips (Fig5.)
Hair Styling
Taking care of rebellious hairs can be achieved with the Clone Stamp Tool once more.
I use the Clone Stamp Tool in this portrait to get rid of forehead hair and some of the hair near the model’s ear.
Adding a Touch of Contrast with Levels
Sometimes, you may wish to add just a bit more contrast to your portrait shot. This can be done very quickly with Levels.
Go to Image->Adjustments-> Levels ( CTRL + L ) and set the values as seen in the pic above. This darkens the shadows and boosts the highlights.
Before & After
You can take a closer look yourself from the source files if you wish. Good luck!
Shaan Graphics is a premier Image Editing service provider, providing this exclusive glamour retouching service with Internationally lowest price guaranteed. Shaan Graphics Image editing service starts from $0.50 only.


1 comment:
I have been running a blog within this same topic with regard to merely 2 years now, what I possess often thought is that it will take time to be able to conquer with this factor. But when I just read your post, I had been genuinely amazed that there are lots of ways to do it and have and even much better advantages. Photoshop Clipping path is best and low cost service please visit http://www.clippingpathsource.com/ for more information about clipping path.
Post a Comment