Step 4
Now we’re going to focus on the actual airbrushing. This is a delicate process that requires a certain amount of patience and experience. Depending on your wishes or your client’s wishes you will have to decide how much airbrushing you want to apply. For instance, models in magazines and especially adult magazines are usually heavily airbrushed since they have to look ‘perfect’. On the other hand there are cases where you might just want to tweak the face by removing a few wrinkles or smoothing out the skin in a few places. For this reason, when I do the airbrushing, I generally do it over a few layers which gives me the option to switch layers on and off depending on how much texture I want to preserve in the end. On this image, I did the major airbrushing in two layers and merged them afterwards.
The trick is to use a low opacity (between 10 and 20 percent) soft brush. The color we pick comes from the image itself. When we pick the color, set the sample size of the Eyedropper Tool (I) to 51 by 51 pixels. If I remember correctly, this feature has only been available since CS2, so if you are using a version before that you will sample the color from a single pixel. Try to select an area where the skin is more or less smooth or set a flesh tone manually. Brush over an area multiple times and watch it become smoother.
Step 5
After the airbrushing, let’s tweak the lips and the eyes. The lips have been slightly saturated using the same technique as in step 4, just pick a color from the lips instead. Then make a selection around the eyes and use ‘Layer via Copy’ (Ctrl+J), which can be found under Layer > New > Layer via Copy, to copy the selected part onto a new layer. Make sure this layer is on top at the moment. On the new layer, use the Dodge Tool with the settings shown below to lighten the iris.
Step 6
This is the final step before we apply our adjustment layers and bring this piece to life. In this step, we’re going to focus on the eyes a bit more, since these are very important in any portrait photograph.
1. Using a low opacity (15-20 percent) black brush, we enhance the make-up around the eyes. Don’t worry if the change seems small, it will pop as soon as we add those adjustment layers.
2. With the same technique as used in step 4, get rid of those wrinkles around the eyes. Yes, we all have them or we are going to have them, and yes, we all seem to hate them.
3. Finally, let’s desaturate the sclera (the white part of the eye). There are several ways to do this, but I believe that the easiest is simply to create a layer, select a white brush, and go around the white bit of the eye and set the mode of the layer to color. It’s quick, easy and gets the job done nicely.
Step 7
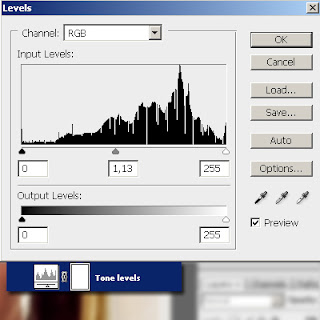
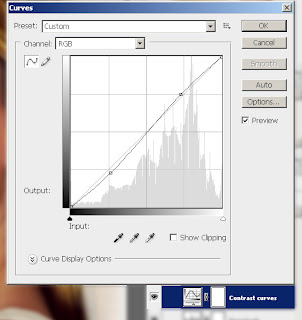
Time for the grand finale. This is the part where we make our picture stand out using the adjustment layers shown below. The adjustment might seem tiny but they make that crucial difference:
The levels and curves layers add contrast to the image as a whole and enrich the colors.


The brightness/contrast adjustment layer makes the make-up around the eyes and the lips pop out. As you can see, there’s a mask applied to the layer. It is entirely black (therefore hiding the effect) except for the area around the eyes and the lips.

The lip hue/saturation adjustment layer adds a vibrant pink color to the lips. Again a mask is applied to limit the effect strictly to the inner area of the lips.
And finally, another hue/saturation adjustment layer to slightly remove the warm shade from the face.
And well, did all of this make a difference? You decide:
Conclusion
Well there you go, a complete overhaul. Oh, and just in case there’s this voice in your head saying ‘Well, she looks too fake,’ send the image around to some friends and ask if they think that to. When you actually see the process take place, the person seems to look fake afterwards because you know what is wrong, but when you show the image to someone who doesn’t know it’s a Photoshopped image, you will get a completely different response. Download the PSD to see the larger image and you will appreciate the work even more (available via Plus Membership).
Have fun!
Shaan Graphics is a premier Image Editing service provider, providing this exclusive glamour retouching service with Internationally lowest price guaranteed. Shaan Graphics Image editing service starts from $0.50 only.


3 comments:
I have been running a blog within this same topic with regard to merely 2 years now, what I possess often thought is that it will take time to be able to conquer with this factor. But when I just read your post, I had been genuinely amazed that there are lots of ways to do it and have and even much better advantages. Photoshop Clipping path is best and low cost service please visit http://www.clippingpathsource.com/ for more information about clipping path.
Wonderful Tutorial, thanks for putting this together! This is obviously one great post. Thanks for the valuable information
The Photo Editing is a team of 180+ professional graphic designers. We are ready to provide the best quality by fulfilling your image editing requirements. We are a top rated Clipping Path Service Company. We have a vast knowledge & experience in working with Photoshop, and Photo Editing Service.
Post a Comment