Construction icons have always been popular on-screen, and although those dot-com “under-construction” pages have mostly vanished from our screens, the trusty ol’ yellow helmet icon still has its uses. In this tutorial, we’ll be creating our very own icon from a photograph.
Step 1
As a base, we will use this photograph I took. It’s not the greatest photo, but we can use it to define the basic shapes. The advantage of this photo is the fact that it was taken with wide-lens camera, and the perspective is nicely visible. When we talk about icons, perspective is very often VERY excessive, so this is perfect.

Step 2
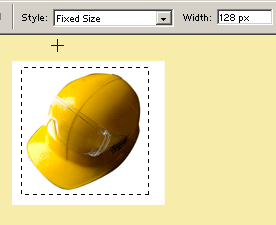
So firstly, cut the helmet out of its background. You can do this using the Pen Tool, or your favorite way of extracting images. Then copy this photo into a new Photoshop document and resize the image to fit the icons dimension — probably 128×128 px. You can use, for example, a new layer sized 128×128, which will help you to be more accurate. Or you can, of course, use document sized 128×128 px, but I like to have more space for drawing.
Step 3
Select the Pen Tool and step-by-step trace each part of the helmet. We begin with the visor area. Don´t worry about the color, it’s the shape that’s important. For better accuracy, it’s good to decrease the layer´s visibility (Opacity). Simply press the numlock key corresponding to the percentage opacity you want &mdash for example, 5 for 50% Opacity. When tracing, be sure to draw as a Shape Layer (first icon on the Options bar), so you can modify this layer in the future.
Note that because we’re just tracing the visor, it doesn’t matter that the rest isn’t accurate around the helmet shape (we’ll do that in the next steps).

Step 4
Create the second part of the "peak" by copying the previous layer (Ctrl + J) and move the selected points upward with the Direct SelectionTool (A).

Step 5
Then trace the main part of the helmet as shown below.

Step 6
Don´t forget the embossed part in the middle (magnified on the next screenshot). You can make it purposely bigger, because the middle streak will nicely help you to define the 3D shape of the helmet.

Step 7
That is why you can draw this streak as a new layer too. First, start with the right part – which is in the shadow.

Step 8
Then duplicate this layer (Ctrl + J) and with Direct Selection Tool, move the point on the right to the left. This way, the right side of this shape will perfectly fit the left part of the previous layer.

Step 9
You are ready to go to the next level. Hide the photograph (or move it to the side), and as you can see, the basic shape of our icon is done. You should now have five layers of shapes ready for the next stage. I’ll refer to them by numbering in order of how we drew them (1-5)

Step 10
To start, hide all layers except the first one (1) and fill this layer with yellow color (#FFDF14). Then create new layer (Ctrl + Shift + Alt + N), and group it with previous (Ctrl + Alt + G). On this screenshot, it´s layer (2). Into this layer, draw with big soft brush with darker color (#D59D00) so the layer will be darker on the right side. Next, load the selection of layer (4), invert the selection (Ctrl + Shift + I), create new layer (3) and again use big soft brush to draw a shadow on the right side ( #3B1C02).

Step 11
So that you don´t have to do it all again for layer (4), show this layer with decreased opacity to 50%. This way, you can still see the shadow from the previous layer — how easy. For now, the "peak" is done and you can continue with the main part of the helmet.

Step 12
So, unhide the shape of main part and recolor it to the yellow (#FDDB13). Again, create a new layer, group it with previous (Ctrl + Alt + G), and in the marked areas, use big soft brush with darker color. It´s not necessary to make a very big shadow…

Step 13
For a better result, you can use the middle streak. Unhide this layer, recolor it to the dark yellow (#AA6F00), and add a layer mask. Into this mask, draw in the middle with a big soft black brush (as shown below), and the layer will be visible only on the sides, not in the middle.
Step 14
Next, unhide the last layer, the main part of the streak. Recolor it to yellow (#FBD500). In this step, you can also darken the main part of the helmet to match the peak.

Step 15
To make the shape of the helmet more accentuated, use this simple method: draw a one-pixel outline around every shape where the light shines.Start with second peak layer. Load the selection (Ctrl-click on the layer), create new layer, and from the Edit menu select the Stroke function. Set the Width to 1px, color white.

Step 16
Add a layer mask to this layer and fill it with black color. This way nothing is visible. Then select a big soft white brush and draw into the mask where the light should shine. The outline will be visible only where the white area is in the mask.

Step 17
Use the same method for the other shapes. The icon is really starting to take shape now!
Step 18
Continue with another darkening in selected areas (shown) where the contrast between the helmet parts is too low.

Step 19
To make the icon even better, you can add backlight with another color. This will help a lot because icons with only one color tend to look a little dull.
Firstly, load the selection of all shape layers (Ctrl + Shift – click on the layers), create new layer, contract the selection of 1 pixel (Select > Modify > Contract), and use a big soft brush to draw the backlight, as the arrow shows. Use whatever color you like, light blue or violet work well.

Step 20
The last thing you will be adding is the very big highlight. Start with Pen Tool and draw the window shapes:
Step 21
Copy this layer (Ctrl + J) and blur it with Gaussian Blur filter (set the Radius to some low number).

Step 22
Now draw with big soft white Brush over the highlights, to make it even more shiny. Don´t worry about the window shapes, it´s not necessary to see them completely.
Step 23
And that´s it!
As you can see in this picture, the helmet is more outstanding on the dark background, so don´t be afraid to experiment and try to create icons from different photographs. Good luck with your work!
Shaan Graphics is a premier Image Editing service provider, providing this exclusive glamour retouching service with Internationally lowest price guaranteed. Shaan Graphics Image editing service starts from $0.50 only.
Visit www.shaangraphics.com for more details


1 comment:
I have been running a blog within this same topic with regard to merely 2 years now, what I possess often thought is that it will take time to be able to conquer with this factor. But when I just read your post, I had been genuinely amazed that there are lots of ways to do it and have and even much better advantages. Photoshop Clipping path is best and low cost service please visit http://www.clippingpathsource.com/ for more information about clipping path.
Post a Comment