This tutorial shows a couple of simple techniques you can use to enhance your portraits. I will focus on retouching the skin, the eyes, and the teeth (whitening). To follow this tutorial, you must already know some Photoshop basics: working with layers, making simple selections, and using basic tools.


Step 1: general adjustments
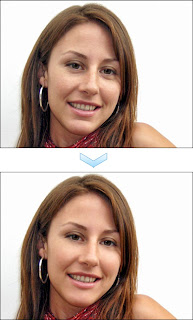
As with any photograph, before you get into detailed retouching you should fix the general flaws: in lighting.
In this case, our image has an obvious overexposure problem on the girl’s blouse, but this is beyond the scope of this tutorial, where we will focus only on the face
Let’s open the shadows a little: go to Image > Adjustments > Shadows/Highlights and fill in the settings from the image below.

We recovered more details from the shadows, but we lost the depth and the picture appears flat. Go to Image > Adjustments > Exposure and fill in the settings below.This way we get some depth in the shadows (but don’t overdo it, especially on low resolution images, because you will easily blocky areas of plain black).

Next, let’s adjust the Curves to obtain a better contrast and more volume (Ctrl + M and draw a curve like in the picture below).

The picture already looks much better than the original, so let’s take it further into the retouching.
Step 2: cleaning the skin
Cleaning the skin is usually done with a combination of the clone tool and the healing brush. The main difference between the two is that the healing brush preserves the texture of the skin better. The clone tool keeps the texture exactly only when used with a hard-edged brush, which is not something you want to do when retouching the skin. The healing brush doesn’t work all the time (especially in areas close to edges ), that’s why the best thing to do is to use the combination with the clone tool.
When retouching skin, you want to keep as much of the texture as possible. Some beginners love to use the blur tool (or even a filter like Surface Blur) to smooth the skin, but this will only give it a plastic, artificial look. Also, when retouching areas like the shadows under the eyes, or wrinkles – don’t overdo it! It’s best to keep your retouching into a separate layer so you can adjust the opacity and find the most natural look.
So, create a new layer (Ctrl + Alt + Shift + N) on top of your background and hit the J key for your healing brush tool (or S for the cloning tool). In the options bar at the top, make sure that the Sample option is set to Current & Below. Basically, use the healing brush to clear blemishes, freckles, imperfections on skin, and use the clone tool (at low opacity, I usually start around 25-30%) to lighten the areas under the eyes, to smooth wrinkles, to soften sharp shadow edges. In our case, the model’s skin is not too bad, so the retouching will be minimal.
Clean up the acne marks spot by spot, the freckles on her nose and the loose strands of hair with the healing brush. Then lighten up the shadows under the eyes with the clone tool, on a separate layer. I used a soft brush around 20 px large, at 20%. While at it, soften the line of the shadow under her chin. Then, on a separate layer, with the healing brush, try to bring back some of the texture of the skin. The advantage of having these retouchments on separate layers is that you can erase parts you don’t want and alter the opacity so you can get the most natural look. Here’s my result:

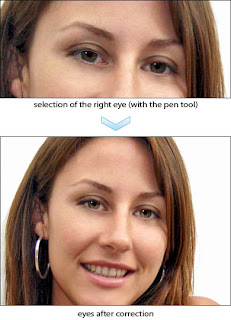
Step 3: brightening the eyes
Bringing out the eyes will make the difference between a dull portrait and a one that captivates the viewer. Professional photographers use careful lighting to catch the vibrancy of the eyes, but you can use your retouching skills to enhance the glance of your subject.
In our portrait here, the model’s eyes are pretty much shaded and in desperate need for some brightness. However, keep in mind that, again, moderation is key: do not whiten too much the white of the eyes because it will look unnatural!
Let’s start by selecting each eye from the original picture. You can use the polygonal lasso, although I recommend for most selections the pen tool. If you use the pen tool, outline the shape of the eye and then load the shape as a selection and, while on the background layer, hit CTRL + J to copy the selection in a new layer. If you use the lasso, hit CTRL + J when you’re done (same effect as above). Do the same for each eye.
(For the basic use of the pen tool for selections – without knowing Bezier curves – see a tutorial I wrote a while ago and posted on my fine art website: Cutting and blending techniques.
We will use these layers to adjust the white of the eyes. But before that, let’s select the pupils and paste the on their own layers (on top of the eyes layers). You can select them from the original layer or from the new eyes layers. Don’t forget to label your layers accordingly and to organize them in groups!
Now, for each of the eyes layer, go Image > Adjustments > Brightness & Contrast and set the Brightness to +20. You may notice now some red specks on the whites, which you can clone out with the clone tool.
Now, select the pupils’ layers and repeat the Brightness & Contrast adjustment, but this time with much higher parameters (brightness 90/ contrast 60, or just experiment until you like the result).
The eyes have improved a lot, but we got some red artifacts is the pupils, which we can get rid of easily. Select the layer of the left pupil and hit Ctrl + U to bring up the Hue/Saturation dialog. From the Edit drop-down choose Reds and use the following settings: Hue: +15, Saturation: -32, Lightness: 0. This way, we shifted the reds towards a green hue. Hit Enter to apply the settings. Then, select the other pupil’s layer and hit Ctrl + Alt + U. This combination will bring up the Hue/Saturation dialog with the settings last used already filled in, so you can just hit Enter and you’re done!
(Tip: use the Alt key in combination with other shortcuts for Adjustments or even for Filters, to start with the settings last used instead of the default settings).

There are more enhancements that can be done to the eyes (like painting in catch lights and shadows), but for now we’ll stop here and move on to the next step.
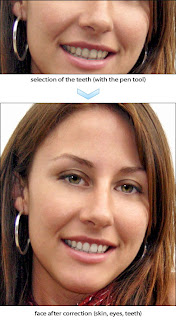
Step 4: whitening the teeth
Unless you’ve just come from a whitening session at your dentist, anyone could use some post-processing teeth whitening. There is an easy way to give this girl a brighter smile: select the teeth and paste them into their own layer. I useed, as usual, the pen tool (but you can use the polygonal lasso if you wish).
Once you have the teeth in their own layer, hit Ctrl + U just like before and select to edit the Yellows this time. You don’t want to reduce the Saturation (it will only make them look grey), but to increase the Lightness (+45). Since they still look too dark, select the Reds in the Edit dropdown and increase the Lightness to +30. Be careful not to make them look grey! Hit Ok and then go to Image > Adjustments > Brightness/Contrast and up the Brightness to +12. Then hit S to grab your clone tool and clone out the too bright spots (zoom in closely).

Step 5: further improvements
There’s much more that you could do to improve this portrait, but it extends beyond the scope of this tutorial. For instance, her skin appears too dark on the lower half of the photo. Then, I would get rid of the shadow on the wall that you can see along her arms. In fact, a completely new background would be even better. The hot spot on her shirt could be fixed by cloning fabric from the other side. The scarf could use a more saturated red. And so on… We’re a long way from a magazine cover, but also a long way from the initial shot.

Shaan Graphics is a premier Image Editing service provider, providing this exclusive glamour retouching service with Internationally lowest price guaranteed. Shaan Graphics Image editing service starts from $0.50 only.


5 comments:
I've long recommended that people seeking to possess a good understanding of this kind of topic spread their particular research across many blogs so as not to abide by wrong information. You've got provided so many sites for people like me for starters. But this can be confusing for some. Let's not forget the only real enemy here's not being focused. This will happen to some. And so my advice is: Stay focused. Thank you
Please visit http://www.clippingfactoryindia.com/ to know more about clipping path service.
Wonderful Tutorial, thanks for putting this together! This is obviously one great post. Thanks for the valuable information
Great guide on photo retouching. Do you recommend any course for which will help learning more about retouching.
Wow, very nice step by step demonstration. It is quite easy to follow. I'm also working with different clipping path platform for editing my images. However, your tutorial will help in my work as well. Very good initiative. Please keep sharing more. I'm waiting for your next tutorial. clipping path
Thank you for this. Photo retouching is a very popular tool in photoshop. Most of the time designers use this photo retouching to make a perfect colour contrast. I hope you will post more about photo vector tracing for everyone.
Post a Comment