In this i offer advice on how to achieve skin softening using low and high pass filtering. The article is enhanced with illustrative figures and screen shots, and includes example images.Whether you are just entering the world of digital photography and need some tips and advice on how best to post-process your images, or are a seasoned pro, the insights shared here should be helpful with your own digital post-processing techniques.
Advanced skin softening with low and high pass filtering and noise reduction
This tutorial will show you how to adjust a model's skin without losing skin structure and texture. I call this approach "High Pass + Low Pass Filtering." It splits the image into two layers:
- One layer holds the texture and fine details of the image (high frequencies)
- One layer holds the tones of the skin and its color (low frequencies)
Furthermore, we will apply noise reduction to create a clear frequencies layer.
Tools: Adobe Photoshop CS3 [Mac], Noise Ninja
Step 1
My example is a close-up of a face. Your first job is to clean up the main problems like spots, bumps, and skin imperfections with the healing brush tool. This is a fairly easy job so I won't go into details here. We will see here how to reduce and adjust both the texture and tones of the skin. On this image, my goal will be to
make the texture of the skin less obvious, as well as brightening the side of the mouth and the bottom of the eye.

Step 1: Close-up of Face (original)
Step 2
Make a rectangular selection around the face and duplicate it twice (Layer->New-> Layer via Copy). You will end up with two layers: the topmost one will hold the texture, while the tones and softening is handled by the second one. I've renamed them for easier understanding. Select both of them and group them, and add a mask to the group with Layer->Layer Mask->Reveal all. Adding a mask is important as it will help you with hiding parts that shouldn't be affected by corrections, such as the eyes, the mouth, and the side of the face. To hide things, just paint on black over the mask. This will be typically done at the end. For the moment, just focus on the main corrections without looking at parts that shouldn't be affected, such as the eyes, hair, etc.
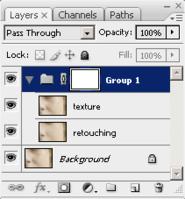
Step 2: Layer Mask
Step 3
Hide the texture layer and select the retouching one. To create the low frequencies, you simply need to soften or blur the image. I suggest to pick up Filter -> Blur -> Surface blur. Use a radius of, say 7, and raise the threshold towards 11. This should blur the skin. If you own an older version of Photoshop, a Gaussian Blur will do it too, but color blending will occur on the edges.
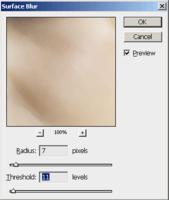
Step 3: Apply Surface Blur
Step 4
Still on the retouching layer, pick up a soft brush with a low opacity (20% is fine - you can change this on the top bar). Now gently paint on top of your image to remove elements that you don't like. Use Alt + Click to pick up a color and then paint over the layer. Your result should be pleasing, even if it lacks texture. On my
example, I've brightened the areas that I didn't like much on the original image.

Step 4: Remove unwanted elements using a soft brush
Step 5
Now activate and show the texture layer. Next item is to retrieve the details that have been lost. I will use the Noise Ninja plugin here. As with other noise-reduction plugins, Noise Ninja needs to estimate the noise in your image. This profiling is done on specific rectangles that should only contain noise and rather few
color changes. I've cleaned up the rectangles that were automatically created by right-clicking on them and then just drew mine. As you can see, I've picked up an area with almost no changes in colors and luminosity. Now select the Filter tab. Your goal is to adjust the image so that some texture remains, but not too much. I would suggest to lower the contrast (I've picked up a value of 5) and apply no Unsharp Masking (USM) amount (value: 0). USM will try to enhance high frequencies, which is not something that I want. Just play around with these values. The ones I gave as a guideline should be a good start. Once you are satisfied, press OK and apply the filter.

Step 5: Noise Ninja plugin
Step 6
We now have two layers: texture contains the softened skin but had some dark areas that were fixed on the retouching layer - unfortunately, loosing texture at the same time. How can we combine both? This is actually quite easy: on the texture layer, apply Filter -> Others -> High pass with a radius of roughly 8. This makes a gray image with only details available. Don't panic! This is normal. Now go to Image -> Adjustments -> Hue / Saturation and use a saturation of -100. This is necessary as some color artifacts are created by the High pass filter. Finally, in the Layers window, change the blending mode of the texture layer from Normal to Overlay. You will now successfully see your texture merged with the previous retouching. If your texture isn't strong enough, apply an Image -> Adjustments -> Brightness/Contrast on it and pump up the contrast a little more.

Step 6a: Apply high pass filter

Step 6b: Change texture layer from normal to overlay
Step 7
This is it. Just paint in black on the mask of the group to remove areas that shouldn't be processed. Remember that masks are quite helpful. You can, for instance, add a mask to the texture layer for finer control, and paint in black on it to hide parts that are too textured.

Step 7: Final edited image
Conclusion
I hope that you have enjoyed this tutorial. High + Low pass filtering add an interesting new dimension to your work and can be used on several problems.
Shaan Graphics is a premier Image Editing service provider, providing this exclusive glamour retouching service with Internationally lowest price guaranteed. Shaan Graphics Image editing service starts from $0.50 only.
Visit www.shaangraphics.com for more details


4 comments:
I have been running a blog within this same topic for merely 2 years now, what I possess often thought is that it needs time to work to be able to conquer with this factor. But when I read your post, I was genuinely astonished that there are lots of ways to do it and have as well as much better benefits. Photoshop Clipping path is best and low cost service please visit http://www.clippingpathsource.com/ for more information about clipping path.
Oh i am really shokking, this post is very nice. I really enjoy it. Thank you for sharing with us. Thanks again very much.
Image Masking Service
Wonderful Tutorial, thanks for putting this together! This is obviously one great post. Thanks for the valuable information .
Thanks for sharing such an informative and step by step demonstration of advanced skin-softening technique. This is exactly what I was looking for. I have to do multiple image editing work by using a product retouching platform. I found this blog is very informative for me. Can anyone please explain the process step by step through the video tutorials? Thanks in advance.product-retouching-service
Post a Comment