Photoshop provides a handful of commands that convert an image to a smart object. But for my money, the most convenient method is to click the little doodad in the top-right corner of the Layers panel and choose Convert to Smart Object. (It works for multilayer images, too.) Go ahead and rename the new layer something meaningful like “Bison.” Now your converted and named image is ready to receive nondestructive smart filters.
3 APPLY SMART SHARPEN
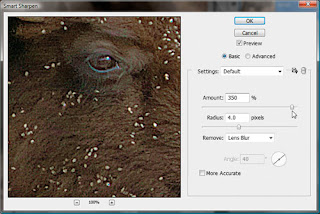
To sharpen the creature, choose Filter>Sharpen>Smart Sharpen. Then set the Amount to 350%, Radius to 4.0 pixels, and Remove to Lens Blur. After clicking OK, double-click the tiny slider icon to the right of the words “Smart Sharpen” in the Layers panel and change the Mode setting to Luminosity. This focuses the attention on the detail in the image rather than exaggerating the discrepancies between color channels—always a good idea when sharpening. Leave the Opacity set to 100% and click OK. Tip: Delete the empty filter mask because it just takes up room. When you do need a mask, it’s easier to create it on the fly, as you’ll soon see.
4 SMOOTH COLOR WITH MEDIAN
Sharpening did my bison some good, but it also brought out anomalous color patches in the fur. What’s needed is a generous pass of the Median filter. Choose Filter>Noise>Median, raise the Radius to a hefty 50 pixels, and click OK. As a rule, smoothing should be applied before sharpening so drag the Median filter below Smart Sharpen in the Layers panel. Double-click the slider icon to the right of “Median” in the Layers panel. (Photoshop warns you that you won’t be able to preview the effects.) Change the Mode to Color to smooth over the considerable coloring problems, and click OK to render the smoothing and sharpening effects together.
5 FIND BEST CHANNEL TO USE FOR MASK
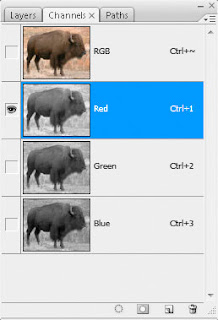
Smoothing out the color works nicely inside the bizarrely (and inaccurately) multicolored bison, but it eliminates all hint of color in the background. What’s needed is a filter mask that exposes the bison and protects the grass. Turn off the Eye icon in front of the words “Smart Filters” in the Layers panel to restore the original image, which we’ll need to build a mask. Click the Channels tab and click the various channels to find the one with the highest degree of contrast between foreground and background. For most people and mammal shots, this is going to be Red.
6 EXAGGERATE CONTRAST IN CHANNEL
Duplicate the Red channel by dragging it onto the Create New Channel icon at the bottom of the panel. Double-click the name (in our case, Red copy) and call it “Mask.” When the mask is complete, the bison should be white and the background black. So press Command-I (PC: Ctrl-I) to invert the colors. Next we need to exaggerate the contrast. Choose Image>Adjustments>Levels. Raise the black point value to 70 and lower the white point value to 190 to draw out the bison from its background. Click OK to complete the effect.
7 LOAD THE MASK AS A SELECTION
Your mask isn’t going to win any awards for accuracy. And if you have some extra time on your hands, you could finesse it using the Dodge and Burn tools or the like. But this quick-and-dirty mask nicely highlights the areas of major color drift and fur detail, making it good enough for our purposes. To load the mask, press the Command key (PC: Ctrl) and click the Mask thumbnail in the Channels panel. Now you’re ready to apply the mask to the filters.
8 OPEN THE IMAGE TO BE SHARPENED
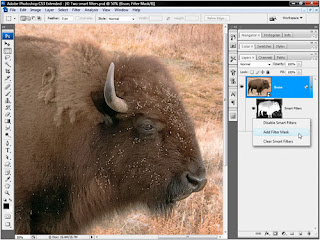
Click the RGB thumbnail in the Channels panel to return to the color composite image. Then click the Layers tab to return to the Layers panel. Turn on the Eye icon in front of the words “Smart Filters.” Then Control-click (PC: Right-click) “Smart Filters” and choose Add Filter Mask. Photoshop limits the Median and Smart Sharpen effects to the interior of the bison and protects the prairie grass in the background.
9 DELETE UNUSED CHANNEL
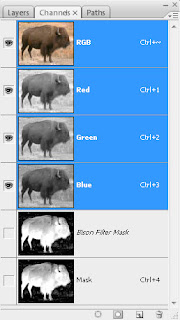
One of the great things about smart objects is that they make efficient use of file size. This particular image was 15.4 MB flat and 15.4 MB after the addition of the two nondestructive smart filters. It’s only when you start adding masks that the file size balloons. We have two masks, one alpha channel and the other a filter mask, so the file size has grown to 25.7 MB. The two masks are identical, so there’s no reason to keep them both. Go to the Channels panel and drag the Mask channel (not the italicized Filter Mask item) to the Trash. The file size drops to 20.5 MB.
10 OPEN SMART OBJECT IN NEW WINDOW
I’m glad to have brought back the colors in the grass. But I’m not so keen on limiting the sharpening effect to the animal. Plus we need to address the horizontal noise patterns at work in the shadow detail. This means applying a couple more filters, neither of which benefit from the existing filter mask. The solution is to
create a nested smart object—a smart object inside a smart object—to accommodate the unmasked filters. Back inside the Layers panel, double-click on the Bison smart object thumbnail to open it in a new window (presumably called Layer 01.psb after the temporary file Photoshop creates to accommodate the smart object).
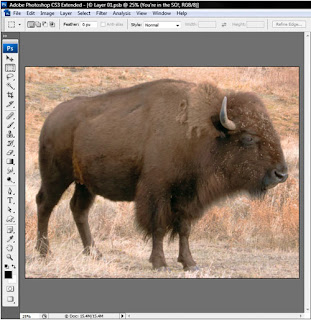
11 CONVERT SMART OBJECT TO SMART OBJECT
You’ll see the original, unedited version of the photograph on a standard Background layer, with all pixels available for editing. Bring up the Layers panel menu and once again choose Convert to Smart Object. Then rename the layer “You’re in the SO!” This way you’ll know where you are if you accidentally enter the smart object. While this adds to the complexity of the file, quite amazingly, it adds nothing to the file size. In fact, the Adobe engineers I talked to endorse this technique and told me there is currently no limit to how deeply you can nest smart objects.
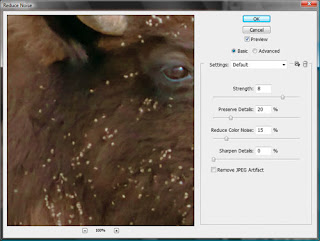
12 APPLY REDUCE NOISE
To downplay the striated noise pattern, choose Filter>Noise>Reduce Noise. Then change the Strength value to 8, Preserve Details to 20%, Reduce Color Noise to 15%, and Sharpen Details to 0%, all of which conspire to smooth away most of the noise without altogether ruining the good detail. Make sure the Remove JPEG Artifact checkbox is turned off and then click OK to apply the filter.
13 APPLY HIGH PASS FOR EDGE CONTRAST
You don’t need the filter mask so drag it to the Trash in the Layers panel. Next we want to add a little bit of edge contrast, in part to sharpen the prairie grass but also to generally enhance the image detail. Choose Filter>Other>High Pass, set the Radius value to 20 pixels, and click OK. Double-click the tiny slider icon to the right of the words High Pass in the Layers panel. Drop out the grays by changing the Mode setting to Soft Light. Then reduce the Opacity value to 50% and click OK. The result is just enough sharpness to offset the effects of the Reduce Noise filter.
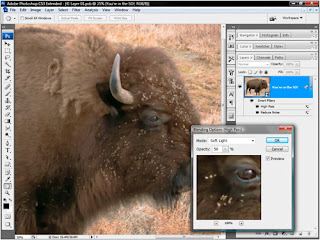
14 ENJOY THE RESULTS AND FLEXIBILITY
Close and save the nested smart object. Moments later, you’ll see the meticulously sharpened result thanks to a combination of four filters working nondestructively aided by two smart objects, one nested inside the other. It takes some effort to sharpen an image with this degree of control and accuracy, but the results are worth the effort. And you can modify the filter settings without fear of harming the quality of the image. Smart objects aren’t perfect, but with some planning and slightly more patience, you can establish flexible compositions that permit you to apply filters and adjust their order and settings in any way you see fit.
Shaan Graphics is a premier Image Editing service provider, providing this exclusive glamour retouching service with Internationally lowest price guaranteed. Shaan Graphics Image editing service starts from $0.50 only.


2 comments:
I have been running a blog within this same topic with regard to merely 2 years now, what I possess often thought is that it needs time to work to be able to overcome with this factor. But when I just read your post, I was genuinely astonished that there are a lot of ways to do it and have as well as much better benefits. Photoshop Clipping path is best and low cost service please visit http://www.clippingpathsource.com/ for more information about clipping path.
Wonderful Tutorial, thanks for putting this together! This is obviously one great post. Thanks for the valuable information
Post a Comment