Final Product What You'll Be Creating

It’s true. Women spend a lot of time getting ready. That is because the makeup application process is quite tedious and time-consuming. The physical process of
Some Things To Consider Before You Start


Step 5
Use the Clone Stamp Tool at a low opacity to softly erase spots, lighten dark circles, and lessen wrinkles by sourcing nearby areas. It’s almost like a regular brush, so using it correctly can create a subtle effect of soft, clear skin. This is similar to the purpose of liquid foundation which helps to even out skin tone. Use this
tool to soften the harshness of the lashes by sweeping a thin layer of color over them. You may also notice that we brought the photo back into Liquify to create the appearance of higher cheekbones.

Step 6
Filling out the eyebrows with a pencil or powder is usually an essential step that all girls remember. Eyebrows are so important because they frame the face and ultimately clean up our look. Using the Stamp Tool, carefully stamp along the shape of the eyebrows to create the base. Select the Brush Tool to finish them. First hit the Alt key to collect the color of the brow then use a hard, low opacity round brush to make realistic strokes of hair along the brow. Use the Eraser to clean them up. If one brow looks better than the other, use the Lasso Tool to select the better brow and copy and paste it onto a new layer. Go to Edit > Transform > Flip Horizontal, then right-click and select Free Transform to position into place.

Step 7
Select a pale area of skin with the Eyedropper. Use both the Brush and Stamp Tools to paint a soft pale color around the bridge of the nose and underneath the eyes at an angle all the way up to the top of the cheekbone. In real life this step would be considered “concealer.” It helps to brighten up the under eye area and mask any overlooked discoloration.


.jpg)

It’s true. Women spend a lot of time getting ready. That is because the makeup application process is quite tedious and time-consuming. The physical process of
applying makeup involves concealing blemishes and painting the face with rich colors. In many ways, the process mirrors that of digital retouching techniques. In this
tutorial, we will explain how to apply makeup digitally using many of the same techniques that women use to apply physical makeup to their own faces. Let’s get
started!Some Things To Consider Before You Start
- Retouch according to what best compliments your subject’s specific features.
- Make sure the colors are synonymous with the mood and aesthetic you’re shooting for.
- Decide what to add or subtract from preexisting makeup.
- Always improve the clarity and intensity of your work through layer adjustments.
Step 1
Natural makeup is all about creating flawless looking skin. So make an assessment of your photo. In this particular case we have a stock photo of a woman with virtually no visible makeup on except for mascara. This photo is perfect because we won’t have to create false lashes later on. The main makeup concepts you’ll be learning today are concealing, contouring, and highlighting. Feel free to make literal or mental notes of which areas to correct.

Step 2
Duplicate the original photo layer and place into a group. This is where all the makeup changes will occur; you can flip back to the original photo at any time to compare the changes you’ve made. Next go to Filter > Liquify and begin adjusting the structure of your model’s face. Use the Forward Warp Tool to create a slimmer appearance by bringing in the sides of her cheek, forehead, and jaw line.

Step 3
We will continue using the Liquify option throughout this tutorial, so feel free to make adjustments to the facial structure until you’re satisfied. Currently the model’s expression seems a little down, so we can alter it by lifting crucial areas of her face such as the corners of her mouth, her eyebrows, and the corners of her
eyes. Now her expression is more pleasant. You can also quickly straighten her nose by pulling it to the right.

Step 4
Typically, people use the Bloat Tool to create fuller lips, but in excess it can lead to an unnatural bulge. For subjects with thinner lips, think about using the Forward Warp Tool instead to pull the lips into a more natural shape.

Step 5
Use the Clone Stamp Tool at a low opacity to softly erase spots, lighten dark circles, and lessen wrinkles by sourcing nearby areas. It’s almost like a regular brush, so using it correctly can create a subtle effect of soft, clear skin. This is similar to the purpose of liquid foundation which helps to even out skin tone. Use this
tool to soften the harshness of the lashes by sweeping a thin layer of color over them. You may also notice that we brought the photo back into Liquify to create the appearance of higher cheekbones.

Step 6
Filling out the eyebrows with a pencil or powder is usually an essential step that all girls remember. Eyebrows are so important because they frame the face and ultimately clean up our look. Using the Stamp Tool, carefully stamp along the shape of the eyebrows to create the base. Select the Brush Tool to finish them. First hit the Alt key to collect the color of the brow then use a hard, low opacity round brush to make realistic strokes of hair along the brow. Use the Eraser to clean them up. If one brow looks better than the other, use the Lasso Tool to select the better brow and copy and paste it onto a new layer. Go to Edit > Transform > Flip Horizontal, then right-click and select Free Transform to position into place.

Step 7
Select a pale area of skin with the Eyedropper. Use both the Brush and Stamp Tools to paint a soft pale color around the bridge of the nose and underneath the eyes at an angle all the way up to the top of the cheekbone. In real life this step would be considered “concealer.” It helps to brighten up the under eye area and mask any overlooked discoloration.

Step 8
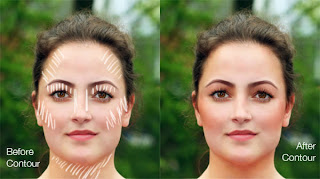
Now let’s add a little color to our subject. Use the Eyedropper to select the brow color. With the brush mode set to Soft Light, sweep the color at a low opacity along the cheekbone. Do this under the chin to create more shadow, and along the temples of the forehead. Real life makeup artists apply this same technique in order to “contour” the face. Use the Burn Tool to darken the hair towards the scalp to create fuller looking hair. You’ll see that this is also the last time we bring the photo into Liquify in order to adjust the chin and left cheek.

Step 9
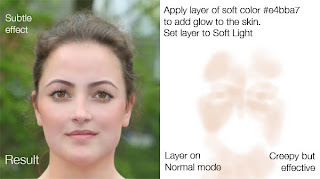
Add a new layer. With the Brush Tool set back to Normal mode, paint the color #e4bba7 along the same areas you contoured using a soft, low opacity brush. Set the layer to Soft Light, and bring down the opacity to 48%. This effect makes the model’s skin glow and her eyes pop with color.

Step 10
Add another new layer to focus on the lip color or “lipstick”. Try to define the shape of her mouth with a hard round brush. For a soft lip finish, select the color of her top lip and fill it in using a low opacity brush to balance out the color. Do the same with the bottom lip. Avoid applying any kind of lip shine effect because it
doesn’t work with this look.

Step 11
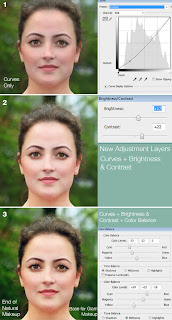
The last step to this natural makeup look is to improve the clarity and intensity of this photo. Add a New Adjustment Layer and select Curves. Make the colors of the photo more rich by bringing the curve down. Add another New Adjustment Layer for Brightness and Contrast and make the following adjustments to intensify the photo. Add a last New Adjustment Layer for Color Balance and make the following adjustments to balance everything out. This last layer also helps to intensify the actual natural makeup look.

Step 12
Professional makeup artists have to exaggerate glamorous makeup so that it picks up well on camera. Keep in mind these techniques are similar to the ones we just did, but instead create more drama to the Hollywood level.Add a new layer for additional contouring. Like before, use the color of the brows to work from. Add more color to the cheeks, neck, and underneath the brow with a soft round brush. Nowadays, makeup artists also contour the nose to make it appear thinner. Add the same color along the side of the nose all the way up to the brow, then set the layer to Soft Light and bring down the opacity to around 70%.

Step 13
Add a new layer and set it to Hard Light. With the same color from the brow, paint along the lid of the eyes. You can even wing it out slightly and apply a small beauty mark upon the cheek for a retro makeup look. Adjust the layer opacity until you’re satisfied, in this case it’s 88%.

Step 14
Add another new layer for the lip color. We’re still going for a matte lipstick effect because it’s more suitable for this look and we’ll be adding shine in a different way in our next step. Set the layer to Soft Light and apply a thin layer of the color #971f24 to the lips with a soft round brush. Bring down the opacity to 35%.

Step 15
Lastly, add another new layer for highlights. Highlights are often done with shimmery makeup and enhance areas by making them appear brighter, fuller, and higher. Using a bright color that’s almost white, gradually apply highlights to the brows, inner eye duct areas, upper cheek bones, and Cupid’s bow with a low opacity round brush. This effect is truly what transforms the look the most, from natural to glam.

Conclusion
No matter the look you’re going for, you can learn from actual makeup techniques to enhance the realism of your retouched photos. Have fun!

Final Image
.jpg)
Shaan Graphics is a premier Image Editing service provider, providing this exclusive glamour retouching service with Internationally lowest price guaranteed. Shaan Graphics Image editing service starts from $0.50 only.


11 comments:
I have been running a blog within this same topic with regard to merely 2 years now, what I possess often thought is that it will take time to be able to conquer with this factor. But when I just read your post, I had been genuinely amazed that there are lots of ways to do it and have and even much better advantages. Photoshop Clipping path is best and low cost service please visit http://www.clippingpathsource.com/ for more information about clipping path.
I am newbie to Phtoshop and learning new tips and tricks of photo editing day by day. This trick will surely help me develop my skills as a professional designer. Thanks a lot!
image masking services
very informative and learning source tutorial.
Thanks for sharing such a great article.
Clipping Path Service
This tutorial is very helpful for me but i think it will be very helpful for all categorizes beginner
clipping path services here please visit us >> http://clippingpathking.com/
Hi Dewan Shuvo, It is really outstanding tutorial. I thing it will increase my graphic design knowledge.
clipping path | clipping path service in Usa | clipping path service | remove image background | Ghost Mannequin Service
Thank you for including me in this great selection of creative persons! Wish you all a great new creative year.Thanks a bunch for your post. Really enjoyed that!!
Pls Take a Look our Photo editing pages.
Image Work India
Clipping Path Service
Photo Retouching Service
Remove Background Service Provider
Color Correction Service
Ecommerce Photo Editing Service
Ghost Mannequin Service
Image Masking Service
Jewelry Retouching Service
Shadow Creation Service
Amazing, this is a great article! I did enjoyed reading it, keep your post .
Thanks for sharing such an informative and step by step demonstration of Realistic Makeup Application in Photoshop. This is exactly what I was looking for. I have to do multiple image editing work by using a product retouching platform. I found this blog is very informative for me. Can anyone please explain the process step by step through the video tutorials? Thanks in advance.product-retouching-service
Basically, in most of developing countries like us, a class of educated manpower doesn't get their prospected job with a wise pay and for this reason, they get remained unemployed. essentially our purpose is to get rid of the unemployed people from our country.
Clipping Path.
Thanks for sharing your best thoughts. I've got really inspired to read your article. If people want to know about clipping path service then don't miss the chance to visit our website Clipping Path Service .
Post a Comment