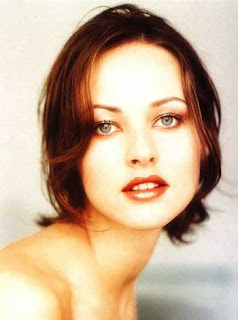
For the Tutorial We choose a picture of a beautiful lady
In this first stage we will give more color to the hair and face. First duplicate the Background layer.
Layer > Duplicate Layer - Name it "Blur"
Blur a little: Filter > Blur > Gaussian Blur > Radius = 5 px
Change the layer to Soft Light mode with a 75% transparency. This brings a better definition of the image and recovers the color a little.
Above the Layer Background make a new layer to finish giving life to face.
Layer > New > Layer - Name it "New Color" or whatever you want.
Fill this layer with the color 75,25,25 using the Paint Bucket tool. Then change this layer to Soft Light mode with 75% transparency.
2. - Eyes and Lips...
Up to now really looks very well, however their eyes get lost a little, the same as their lips.
Make a new layer, above the layer "blur", name it "lips".
Layer > New > Layer
Use the Zoom Tool to increase the area of the lips and use a paintbrush of the appropriate size to paint the lips with the same color: 75,25,25.
Begin marking the contour with a thin paintbrush, then fill with a wider one.
Change the layer lips to Soft Light mode and like magic art some succulent lips appear.
As you will see, there is a small clear point in the left corner lips, also another close to the center of the inferior lip, something that seems like a grain.

It is necessary to correct this with the Clone Stamp tool at 50 - 35%. Sampling (pressing the Alt key, and clicking with the mouse) fair to the center of these two imperfections. All this on the Background layer.

The lips are ready, now lets go for the eyes, she will use blue color eyes, blue as the sky to where she belongs.
Make a new Layer above all the other ones. Layer> New> Layer - Name it "eyes "
With the Heliptical Marquee tool make a selection that adjusts around one of her pupils. Go to Selection > Transform Selection to adjust as much as possible to the pupil.

Selects the white color and fill the selection pressing Alt.+ Delete.
Once its full, with the Eliptical Marquee tool drag the selection to the other eye (not in all the cases it is the same diameter) and also fill it.
Deselect by Pressing Ctrl + D.
Then load again the selection, but now of both eyes.
Select > Load Selection - Channel = eyes Transparency
Now its time for color: blue. Image > Adjust > Hue/Saturation - Colorize - Hue = 220 - Saturation = 100 - Lightness = -20
Deselect pressing Ctrl + D. Then take this layer to Soft Light mode and adjust its transparency value if you decide to decrease the color intensity.
And she is Ready.
Shaan Graphics is a premier Image Editing service provider, providing this exclusive glamour retouching service with Internationally lowest price guaranteed. Shaan Graphics Image editing service starts from $0.50 only.


No comments:
Post a Comment