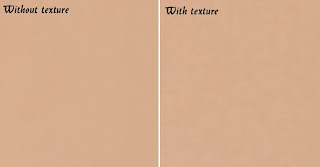
The texture created in this layer will contribute to the final results very minimally – the difference can only be easily seen zoomed in on high resolution images and varies from image to image. Even though the result is very minimal, it ensures that no area of the skin looks too smooth or plastic.
Below is an example of this. On the left, the image looks like a solid color, also known as plastic skin. The image on the right has a slight noise pattern to make the skin look more realistic.

Step 5
Make sure that you have the "Texture" layer selected. With that layer selected, press Shift+F5 or choose Edit > Fill. In the Fill tool, set the settings according to the image below. This will fill your layer with a 50% gray color.
Step 6
Open the Add Noise filter from the Filter > Noise menu. Enter in the settings shown in the image below. This will add some noise to the image that will prevent skin from looking plastic. It may look a little too sharp, but in the next step, we’ll fix this with a Gaussian Blur filter.
Step 7
Choose Filter > Blur > Gaussian Blur. Blur the layer by 1 pixel.
Step 8
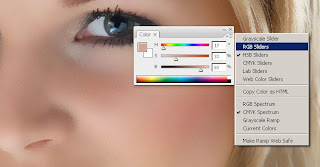
Now we’ll temporarily tint the color of this layer. First, select the Eye Dropper tool from the toolbar. Sample an area on the skin that appears to be the average skin color. You don’t have to be very precise because we will tune the color later in the tutorial. In the Color palette, click on the flyout menu below the close window button and select HSB sliders. We’ll need to see the HSB values for the next step.

Step 9
Open the Hue/Saturation tool by pressing Ctrl+U or choosing Image > Adjustments > Hue/Saturation. Check the Colorize option and adjust the hue, saturation, and lightness values to match the HSB values from the color we sampled in the previous step. For the brightness, set this to
Step 10
Select the Airbrush group in the Layers palette and add go to Layer > Layer Mask > Hide All. This will create a layer mask filled with the color black that will hide the group. With this layer mask, we’ll paint the areas were we want the skin to appear. Otherwise, this skin airbrushing effect will appear on the entire image.
Step 11
First, press D on your keyboard to set the foreground and background colors to the default black and white. Select the Brush tool and apply the settings below.
Zoom in to 100% and paint over the skin. The parts that you paint will appear smoother with a different skin tone. Don’t worry if the skin tone doesn’t look correct. This is because we didn’t pick the correct color when we used the Hue/Saturation to tint the "Texture" layer. It’s too difficult to do that without a preview, so we’ll fix that later.
When painting, you’ll need to change the brush size and hardness frequently. It would be tedious to always access the brush option menu to do this so take this as an opportunity to use hot keys. Use the following hot keys to help you with modifying the brush size and hardness:
Decrease brush size: [
Increase brush size: ]
Decrease brush softness by 25%: Shift + [
Increase brush softness by 25%: Shift + ]
When you’re done, your layer mask should have the skin areas in white and the skin should look smooth.


60 comments:
clipping path service we provide Professional Face Touchup, Photo Retouch Multi Clipping Path, Photo Restoring Service and many more services...
Photoshop Clipping Path Services
thanks for your great post.i see your site and informations are very helpful.i am also following your step about
www.clippingpathservice.com
nice article it is so good to do
clipping path service
This blog kept my faith up when I was wondering if I must quit. I'm eventually starting to get a bit of understanding of this subject matter and how to benefit. It's also hard working on your part because author of this wonderful post. I've simply started a website, and I think this article is fantastic advice to anyone who wants to learn the critical strategies. The only problem is the fact that I need more time to learn and learn more. Perhaps that will improve as i start my annual vacation next month. Please visit http://clippingpathsource.com/ to know more about clipping path.
wow what a post it is. it can help everybody who want to know about clipping path service. i really love it.
clipping path
wow what a post it is. it can help everybody who want to know about clipping path service. i really love it.
clipping path
Thanks for the post. I'm also an expert and that i have just started writing blogs which i considered was very hard to perform until I read your own article. I found your blog very helpful with fresh concepts I did not know before. In the next few weeks, I'll be busy writing a number of articles for my own new blog. I really hope people will find them valuable like yours.
Please visit http://clippingpathsource.com/ to know more about clipping path service.
Informative post. Love photoshop and its feature always
Multi Clipping path Service
A nice and helpful sharing for designers specially for fresher.
Hi, how nice your services. I am very interested that. More services you are provided to us and personal thanks for that. I like your services. I am happy for your image editing services and we are satisfied of our services. Nice site about photo editing and you are work professionally. For more about photo masking
Thank you very much for informative post. I like it & Lovely work..
I have been running a blog within this same topic with regard to merely 2 years now, what I possess often thought is that it will take time to be able to conquer with this factor. But when I just read your post, I had been genuinely amazed that there are lots of ways to do it and have and even much better advantages. Photoshop Clipping path is best and low cost service please visit http://www.clippingpathsource.com/ for more information about clipping path.
Today we do the enhancement of picture by using clipping path service and i get the tremendous change on my picture. First time i love my picture and get the fabulous comments on this picture.
Very good blog post and a unique sense of information is here. Keep it up!
Shuvo,
Clipping Path
I like this post very much!
Clipping Path
Showing picture into an hardware and software, requirement of cleanness increases. Because visualization more near in comparison to reality. Through this post you recommend how make the picture more colorful and attractive and also provide the use of clipping path service. Thanks for sharing useful information.
Thanks dawan. very nice to create this silo/silhouetter knockout.
Absolutely beautiful works.. This is called “Creativity”.Thanks for sharing this nice post.
Thanks for sharing. It will help me a lot.
Clipping Path Service
Many many thanks for your nice post. this is really very helpful
http://clippingpathking.com/
We have read the blog and it's a nice thing in your blog. Really helpful with the information provided.Thank you for the post. For more information. Visit: photo manipulations
Definitely good photo editing provider
Discover the secret to reversing your painful rheumatoid arthritis in weeks, starting today!
arthritis pain relief
pain relief
natural arthritis relief
Just awesome tutorial. i have a request... can i get this tutorial in video???? is it possible??
Offshore Clipping Path | Clipping Creations India
Superb. I really enjoyed very much with this article here. Really it is an amazing article I had ever read. I hope it will help a lot for all. I am now working at clipping path company and it very helps me a lot. Thank you so much for this amazing posts and please keep update like this excellent article. Also, thank you for sharing such a great blog with us.
I am happy to find your distinguished way of writing the post. While working with a photo editing company I had face a problem like this. Now you make it easy for me to understand and implement the concept. Thank you for the post.
Great service. I am getting more interested about it.
clipping path service
Interest writing. It looks a great service. Thanks for sharing. Clippign Path company
Get background remove service
aT A reasonable price from clipping expert asia.
Great post about clipping path services. I really learn from this blog. Amazing.
Really nice blog about creating a clipping path. Its all about learning to me. Thanks to author for sharing this amazing post for learning. Please keep it going on.
clipping path
box clipping
clipping image
clipping path experts
clipping path service company
clipping path services
image clipping services
multi clipping path
multi path
path clipping
clipping path india
Thanks for helpful article!
Great and excellent photography. You can use clipping path service for beauty enhancement of images Thanks for sharing your photos and nice info.
graphicexpertsindia.com the offshore outsourcing and graphics design firm is ready to help. The goal of our skilled Photoshop retouchers is to meet the customer’s requirements through quality photography post-production services.
I am a professional Photoshop Editor. I am here with vast experience and in-depth knowledge of Clipping Path Service, Color Correction, Photo Retouching, Background Removing, Photo Masking, Deep Etching, Image Manipulation, Photo Editing, Raster to Vector, Clipping Mask, Photo Enhancement, Logo Design and everything related to photos.
Great information!! I really enjoy reading this blog information. Thanks for sharing this informative information.
Ghost mannequin service
Stunning post With important hints and data that helped me to learn more on retouching.Thanks For Posting Such an extraordinary article for us. in addition, I have a Photoshop clipping path service provider Website, Where we give a wide Rage of Photo editing services.
Thanks for sharing such an informative and step by step demonstration of the Superb Skin Airbrush Technique. This is exactly what I was looking for. I have to do multiple image editing work by using a product retouching platform. I found this blog is very informative for me. Can anyone please explain the process step by step through the video tutorials? Thanks in advance.product-retouching-service
clipping path service
for digital photo editing is a milestone for photographic presentation.
Intelligent clipping Path
the offshore outsourcing and graphics design house is ready to help. The goal of our skilled Photoshop retouchers is to meet the customer’s requirements through quality photography post-production services
CLIPPING PATH
Welcome to Cliping Path Associate, Get the photo editing and enhancing service. We are the best clipping path service provider company that offer the professional photo editing service.
to get more - https://www.clippingpathassociate.com/
Clipping Path Service
Welcome to Cliping Path Associate, Get the photo editing and enhancing service. We are the best clipping path service provider company that offer the professional photo editing service.
to get more - https://www.clippingpathassociate.com/
Hope, this tutorial will help people a lot who are eger to learn different photo editing skills like me.
Thanks for the post!
Thanks for sharing the post on photo editing technique.
Clipping path service providers often use Airbrushing Skin technique to make images more stunning. This tutorial is really important for them.
I am heartily impressed by your blog and learn more from your article. Thank you so much for sharing with us. I find another blog as like it. If you want to look, visit here clipping path, It’s also more informative.
Clipping Path Service<a href="https://www.clippingpathassociate.com/"https://www.clippingpathassociate.com/</
Clipping Path Service Providers<a href="https://www.clippingpathassociate.com/"https://www.clippingpathassociate.com/</
Cutout Image Media is a well-known clipping path service provider with 11 years of working experience in the image editing industry. The company is specialized in Photography post-production services for E-commerce and Product Photography. Cutout's highly skilled designers are committed to delivering you high-quality images.
Awesome article! Thank you! What will you post about next?
Best Regards,
Clipping Path
Amazing post. I’m professional Graphic Designer at The Photo Editing. We provide high-quality clipping path service, background removal service, image masking service, neck joint service, ecommerce image editing service, car image editing and photo retouching service at low costs.
Digital airbrushing is a useful technique applied to portrait photos using image editing programs in Photoshop. Airbrush skin will help you hide skin blemishes and imperfections. And if you are a photographer, you will familiar with using this technique to make your shots look glamorous and professional.
Clipping Path service is provided to edit an image. In this service, you will be provided with the best quality image by removing unwanted things or photo background. Without any hard work, you will get a professional photograph.
I am a professional Graphic Designer at Clipping Path Service . If any one need any kind of image editing service please feel free to knock me.
Nice post. I see your site and information are very helpful. I am also following your steps. Thanks for the great post.
Best Regards
clipping path service provider company
Thanks, I really enjoyed very much with this article here. Really it is an amazing article I had ever read. I hope it will help a lot for all. A clipping path is a deep etching technique to remove the background from an image. Keep up the good work.
Great and excellent photography. You can use the clipping path service for the beauty enhancement of images. Thanks for sharing your photos and nice information with us.
Absolutely loved your tips on achieving that flawless airbrushed look! For anyone looking to enhance their photos further, the [photo retouching service] is a game changer!
Your passion for this subject really shines through. Thank you for sharing it with us.
Visit Here: Ghost Mannequin Service
Post a Comment