Tuesday, December 11, 2012

Using a Photoshop Clipping Path within InDesign....


Today we are going to explore using Clipping Paths created in Photoshop within InDesign. The following tut will explain what format to export to and how to apply the Clipping Path using InDesign’s built in features. Additionally I will guide you to the tools needed for editing the Clipping Path and converting to a custom frame.


Step 1
InDesign can use any graphic that has the ability to save a clipping path or alpha channel, for example a TIFF or PSD. I prefer to use EPS format as I have tried and tested it. The first task is to make sure that the graphic contains a clipping path by opening it in Photoshop. Open the Paths palette which can be found by going to Window > Paths, here you will be able to view a path if one has been created.Otherwise save your file as your preferred format.


Step 2
Ok back to InDesign. Open an existing project or for the purposes of this tut create a New Document. Place your image by going to File > Place. Navigate to where it is saved, select it once, press Open and click within the document to place.


Step 3
After placing, the image should still be selected, if not use the Selection Tool to select by clicking once on the graphic.


Step 4
Go to Object > Clipping Path > Options.


Step 5
Within the Clipping Path floating panel open the Type drop down menu and select Photoshop Path. Now tick the Preview tick box to view the Clipping Path.


You will notice that directly under the Type menu sits the Path menu. If you happen to have more than one path saved in the graphic, this is where you choose what path to use. Finally click OK.

Step 6
The path should be selected and highlighted brown. Also the Direct Selection Tool should be active. With this tool you can adjust the path. Simply click on one of the points to adjust, or to activate the handles for adjusting curves.


Step 7
As the path is now an InDesign path you can add and delete points using the Pen Tool. Ensure that the path is highlighted by using the Direct Selection Tool, pick the Add Anchor Point Tool and click anywhere on the path to add a point. Similarly you can use the Delete Anchor Point Tool to remove points by clicking on them.


Step 8
Now that the Path is complete, you now have the option to convert the Clipping Path to a frame. To do this, select the current frame with the Selection Tool and go to Object > Clipping Path > Convert Clipping Path to Frame.


Conclusion
I recommend that you experiment with different images and paths within Photoshop and place them in InDesign. You will discover some images work perfectly and others rely on the extra capabilities that only Photoshop offers to achieve an accurate Clipping Path. Happy designing!


Shaan Graphics is a premier Image Editing service provider, providing this exclusive glamour retouching service with Internationally lowest price guaranteed. Shaan Graphics Image editing service starts from $0.50 only.

Visit www.shaangraphics.com for more details

Monday, December 10, 2012

How to Batch Resize in Photoshop


While it’s relatively easy to write an Action to resize a series of images in Photoshop, it’s easier still to get Photoshop to do all the work for you. Photoshop comes with an image processor script that will open, resize and save a series of images for you – very quickly.

Step 1
Choose File > Scripts > Image Processor. The image processor dialog shows a simple four-step process for resizing the images.


Step 2
In Step 1 of the dialog, select to either resize the images already open in Photoshop (if you have them open), or click Select Folder and select a folder of images to resize. Select Include all Subfolders to include all subfolders of the selected folder.


Step 3
In Step 2 of the dialog select where to save the images. If you select Save in Same Location Photoshop creates a subfolder in which to save the images so you don’t have to worry about overwriting them. If a subfolder by the same name already exists with images with the same names in it, Photoshop saves to that folder but adds a sequential number to the file so you still won’t lose your files. Alternatively, you can select a different folder for the resized images.


Step 4
In Step 3 of the dialog select the file type to save in. For the web Save as JPEG is the obvious choice. Set a Quality value in the range 0 to 12 where 12 is the highest quality and 0 the lowest. For better color on the web, select Convert profile to sRGB and ensure that Include ICC Profile at the foot of the dialog is checked so the profile will be saved with the image.


To resize the images, select the Resize to Fit checkbox and then set the desired maximum width and height for the final image. For example, if you type 300 for the width and 300 for the height, the image will be resized so that the longest side of any image, whether it be in portrait or landscape orientation will be 300 pixels. The images are scaled in proportion so they won’t be skewed out of shape.

The Width and Height measurements do not have to be the same so you could, for example, specify a Width of 400 and a Height of 300 and no image will have a width greater than 400 or a height greater than 300.

Step 5
If desired you can save in another format as well by selecting its checkbox so you can save the same image in different formats and at different sizes in the one process. You can also select to run an Action on the images, if desired.

When you’re ready, click Run and the images will be automatically opened (if they are not already open), resized, saved and closed.

To see your resized images, choose File > Open and navigate to the folder that you specified the images to be saved to. If you chose to save as JPEG, the images will be in a subfolder called JPEG, for PSD in a folder called PSD and so on.

So whenever you need to resize a lot of images for uploading to the web, for example, the Photoshop Image Processor script makes the job almost painless.


Shaan Graphics is a premier Image Editing service provider, providing this exclusive glamour retouching service with Internationally lowest price guaranteed. Shaan Graphics Image editing service starts from $0.50 only.

Visit www.shaangraphics.com for more details


Saturday, December 08, 2012

Image Retouching: Advanced Skin Softening


In this i offer advice on how to achieve skin softening using low and high pass filtering. The article is enhanced with illustrative figures and screen shots, and includes example images.Whether you are just entering the world of digital photography and need some tips and advice on how best to post-process your images, or are a seasoned pro, the insights shared here should be helpful with your own digital post-processing techniques.

Advanced skin softening with low and high pass filtering and noise reduction


This tutorial will show you how to adjust a model's skin without losing skin structure and texture. I call this approach "High Pass + Low Pass Filtering." It splits the image into two layers:

  • One layer holds the texture and fine details of the image (high frequencies)
  • One layer holds the tones of the skin and its color (low frequencies)
Furthermore, we will apply noise reduction to create a clear frequencies layer.

Tools: Adobe Photoshop CS3 [Mac], Noise Ninja


Step 1
My example is a close-up of a face. Your first job is to clean up the main problems like spots, bumps, and skin imperfections with the healing brush tool. This is a fairly easy job so I won't go into details here. We will see here how to reduce and adjust both the texture and tones of the skin. On this image, my goal will be to 
make the texture of the skin less obvious, as well as brightening the side of the mouth and the bottom of the eye.

Step 1: Close-up of Face (original)

Step 2
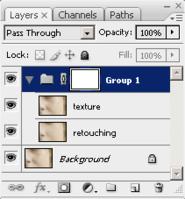
Make a rectangular selection around the face and duplicate it twice (Layer->New-> Layer via Copy). You will end up with two layers: the topmost one will hold the texture, while the tones and softening is handled by the second one. I've renamed them for easier understanding. Select both of them and group them, and add a mask to the group with Layer->Layer Mask->Reveal all. Adding a mask is important as it will help you with hiding parts that shouldn't be affected by corrections, such as the eyes, the mouth, and the side of the face. To hide things, just paint on black over the mask. This will be typically done at the end. For the moment, just focus on the main corrections without looking at parts that shouldn't be affected, such as the eyes, hair, etc.

Step 2: Layer Mask

Step 3
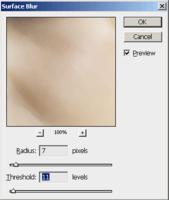
Hide the texture layer and select the retouching one. To create the low frequencies, you simply need to soften or blur the image. I suggest to pick up Filter -> Blur -> Surface blur. Use a radius of, say 7, and raise the threshold towards 11. This should blur the skin. If you own an older version of Photoshop, a Gaussian Blur will do it too, but color blending will occur on the edges.


Step 3: Apply Surface Blur

Step 4
Still on the retouching layer, pick up a soft brush with a low opacity (20% is fine - you can change this on the top bar). Now gently paint on top of your image to remove elements that you don't like. Use Alt + Click to pick up a color and then paint over the layer. Your result should be pleasing, even if it lacks texture. On my 
example, I've brightened the areas that I didn't like much on the original image.

Step 4: Remove unwanted elements using a soft brush

Step 5
Now activate and show the texture layer. Next item is to retrieve the details that have been lost. I will use the Noise Ninja plugin here. As with other noise-reduction plugins, Noise Ninja needs to estimate the noise in your image. This profiling is done on specific rectangles that should only contain noise and rather few 
color changes. I've cleaned up the rectangles that were automatically created by right-clicking on them and then just drew mine. As you can see, I've picked up an area with almost no changes in colors and luminosity. Now select the Filter tab. Your goal is to adjust the image so that some texture remains, but not too much. I would suggest to lower the contrast (I've picked up a value of 5) and apply no Unsharp Masking (USM) amount (value: 0). USM will try to enhance high frequencies, which is not something that I want. Just play around with these values. The ones I gave as a guideline should be a good start. Once you are satisfied, press OK and apply the filter.

Step 5: Noise Ninja plugin
Step 6
We now have two layers: texture contains the softened skin but had some dark areas that were fixed on the retouching layer - unfortunately, loosing texture at the same time. How can we combine both? This is actually quite easy: on the texture layer, apply Filter -> Others -> High pass with a radius of roughly 8. This makes a gray image with only details available. Don't panic! This is normal. Now go to Image -> Adjustments -> Hue / Saturation and use a saturation of -100. This is necessary as some color artifacts are created by the High pass filter. Finally, in the Layers window, change the blending mode of the texture layer from Normal to Overlay. You will now successfully see your texture merged with the previous retouching. If your texture isn't strong enough, apply an Image -> Adjustments -> Brightness/Contrast on it and pump up the contrast a little more.
Step 6a: Apply high pass filter

Step 6b: Change texture layer from normal to overlay

Step 7
This is it. Just paint in black on the mask of the group to remove areas that shouldn't be processed. Remember that masks are quite helpful. You can, for instance, add a mask to the texture layer for finer control, and paint in black on it to hide parts that are too textured.

Step 7: Final edited image

Conclusion
I hope that you have enjoyed this tutorial. High + Low pass filtering add an interesting new dimension to your work and can be used on several problems.

Shaan Graphics is a premier Image Editing service provider, providing this exclusive glamour retouching service with Internationally lowest price guaranteed. Shaan Graphics Image editing service starts from $0.50 only.

Visit www.shaangraphics.com for more details

Friday, December 07, 2012

Cropping Photos Without Changing The Aspect Ratio


Cropping images is by far one of the most common, every day uses for Photoshop. It’s so common that Photoshop comes with a tool designed specifically for cropping photos, conveniently named the Crop Tool. One of the great things about the Crop Tool is that you can easily crop your photos to common photo sizes like 4×6, 5×7 or 8×10 simply by entering the width and height values into the Options Bar before dragging out your cropping border, or by selecting a preset crop size from the Preset picker.


That may be great, but what if you don’t want to change the aspect ratio of the photo? What if you want to crop the image while keeping the width-to-height ratio the same as the original? And what if you’re not sure what the original aspect ratio actually is? You could open the Image Size dialog box to find out the width and height of the image and then do the math, but there’s an even easier way thanks to a rarely used but very useful command in Photoshop called Transform Selection, which is what we’re going to be looking at in this tutorial.


Here’s the photo I’ll be working with. I want to crop the image more closely around the woman’s face and the flowers she’s holding, but I want the final result to maintain the same aspect ratio as the original:

The original photo.

Let’s get started!

Step 1: Select The Entire Photo
The first thing we need to do is select our entire photo. Go up to the Select menu at the top of the screen and choose All at the very top of the list, or use the keyboard shortcut Ctrl+A (Win) / Command+A (Mac). Either way selects the entire photo, and you’ll see a selection outline appear around the edges of the image in the document window:

A selection outline appears around the entire photo in the document window.

Step 2: Choose “Transform Selection” From The Select Menu
With a selection outline now around the entire photo, go back up to the Select menu once again and this time choose Transform Selection near the bottom of the list:

Go to Select > Transform Selection.

Step 3: Resize The Selection
As its name implies, Photoshop’s Transform Selection command allows us to make changes to the selection outline itself without affecting anything inside of the selection. In this case, we want to resize the selection outline and make it smaller until it surrounds only the part of the photo that we want to keep, allowing us to 
crop away everything else. To resize the selection, hold down your Shift key, then click on any of the handles (the little squares) in the corners of the selection and drag the corner inward. Holding the Shift key down forces the width-to-height aspect ratio of the selection to remain the same as you drag, which is what allows us to maintain the same aspect ratio as the original photo.

You can move the selection outline as well by clicking anywhere inside of the selection and dragging it to a new location. Just don’t click on that little target symbol in the center of the selection, otherwise you’ll move the target symbol, not the selection. Continue moving and resizing the selection as needed until it’s surrounding only the area you want to keep:

Hold Shift and drag any of the corner handles inward to resize the selection outline while keeping the aspect ratio the same.

When you’re done, press Enter (Win) / Return (Mac) to accept the transformation.

Step 4: Crop The Image
At this point, all that’s left to do is crop away the area outside of our selection! For that, we can use Photoshop’s Crop command. Go up to the Image menu at the top of the screen and choose Crop:

Go to Image > Crop.

As soon as you select Crop, Photoshop goes ahead and crops away everything that falls outside of the selection, leaving us with a cropped version of the photo that maintains the exact same aspect ratio as the original:

The aspect ratio of the cropped image remains the same as the original photo.


To remove the selection outline, either go back up to the Select menu and choose Deselect or use the keyboard shortcut Ctrl+D (Win) / Command+D (Mac). And there we have it!

Shaan Graphics is a premier Image Editing service provider, providing this exclusive glamour retouching service with Internationally lowest price guaranteed. Shaan Graphics Image editing service starts from $0.50 only.

Visit www.shaangraphics.com for more details

Thursday, December 06, 2012

Creating Dreamy Photos


In this tutorial, I'll show you, in simple, easy steps, one of my favorite techniques- one that I think looks incredible on almost any photo. 

Please note that this tutorial is designed for use with Photoshop CS2. While it may be possible to create a comparable effect in other programs... I would have no idea how to do so. :-P


Ok, so we'll start with this photo,


Let's get started!

Step 1. 
Open the photo in Photoshop. Simple! :-)

Step 2. Duplicate the layer by right clicking the words "Background" in the Layers Palette and clicking, "Duplicate Layer..." Then click "Ok" when the next dialog box appears.


Step 3. Click the little black and white circle at the bottom of the Layers Palette. A box will pop up. Click on "Channel Mixer." This adds an adjustment layer to your copied layer, which will allow you to change some settings on it.


Step 4. In the box that popped up, click on the check box that says "Monochrome." The other settings will vary, but generally you will want to turn the Green up, and the Blue and Constant down. You can see the settings I used here:
 

Your photo should now look something close to this:


Step 5. Right click the adjustment layer in the Layers Palette, then select "Merge Down." This will apply the adjustments that we made on the adjustments layer to the copy of the background image that we created earlier, making a single layer.


Step 6. Right click the newly-created layer, which is called "Background Copy," if you didn't rename, in the Layers Pallete. Then, select "Duplicate Layer..." Finally, click "OK" on the dialogue box that will appear.


Step 7. Now, we are going to make this layer very blurry. Go to Filter>Blur>Gaussian Blur... and click. 


Step 8. Now, use the "Radius" setting on the dialogue box that appears to make the picture undesirably blurry, then click "OK." The picture should be a little bit "too" blurry, but not unrecognizable. Here's the setting I used:


Step 9. Now, we want to make it so that the blurry layer is somewhat transparent, so that it adds a dreamy feel to the rest of our photo. In the Layer Pallete, select the blurry layer, probably named "Background Copy 2" if you didn't change its name, and then click "Opacity." A slider will appear; the effect works best with this setting set between 30% and 60%, but every photo is different. Here's what I used:


Your photo should now look something close to this:


Notice the dreamy texture that is now present (the difference is a good deal more noticable at larger sizes. Sorry). 

At this point you have a very nice photo, that simulates the effects of infrared photography. However, we want to have a dreamy, color photo. So let's continue.


Step 10. Now, we want the color to show through. To do this, we have to make our "Background Copy" layer invisible, which is done by clicking the eyeball next to its name in the Layer Pallete.


Congratulations, you're done! 

Your photo should now look something like this:


Shaan Graphics is a premier Image Editing service provider, providing this exclusive glamour retouching service with Internationally lowest price guaranteed. Shaan Graphics Image editing service starts from $0.50 only.

Visit www.shaangraphics.com http://www.shaangraphics.com for more details