Saturday, December 22, 2012

Realistic Makeup Application in Photoshop

Final Product What You'll Be Creating


It’s true. Women spend a lot of time getting ready. That is because the makeup application process is quite tedious and time-consuming. The physical process of 
applying makeup involves concealing blemishes and painting the face with rich colors. In many ways, the process mirrors that of digital retouching techniques. In this 
tutorial, we will explain how to apply makeup digitally using many of the same techniques that women use to apply physical makeup to their own faces. Let’s get 
started!


Some Things To Consider Before You Start

  • Retouch according to what best compliments your subject’s specific features.
  • Make sure the colors are synonymous with the mood and aesthetic you’re shooting for.
  • Decide what to add or subtract from preexisting makeup.
  • Always improve the clarity and intensity of your work through layer adjustments.
Step 1
Natural makeup is all about creating flawless looking skin. So make an assessment of your photo. In this particular case we have a stock photo of a woman with virtually no visible makeup on except for mascara. This photo is perfect because we won’t have to create false lashes later on. The main makeup concepts you’ll be learning today are concealing, contouring, and highlighting. Feel free to make literal or mental notes of which areas to correct.


Step 2
Duplicate the original photo layer and place into a group. This is where all the makeup changes will occur; you can flip back to the original photo at any time to compare the changes you’ve made. Next go to Filter > Liquify and begin adjusting the structure of your model’s face. Use the Forward Warp Tool to create a slimmer appearance by bringing in the sides of her cheek, forehead, and jaw line.


Step 3
We will continue using the Liquify option throughout this tutorial, so feel free to make adjustments to the facial structure until you’re satisfied. Currently the model’s expression seems a little down, so we can alter it by lifting crucial areas of her face such as the corners of her mouth, her eyebrows, and the corners of her 
eyes. Now her expression is more pleasant. You can also quickly straighten her nose by pulling it to the right.


Step 4
Typically, people use the Bloat Tool to create fuller lips, but in excess it can lead to an unnatural bulge. For subjects with thinner lips, think about using the Forward Warp Tool instead to pull the lips into a more natural shape.


Step 5
Use the Clone Stamp Tool at a low opacity to softly erase spots, lighten dark circles, and lessen wrinkles by sourcing nearby areas. It’s almost like a regular brush, so using it correctly can create a subtle effect of soft, clear skin. This is similar to the purpose of liquid foundation which helps to even out skin tone. Use this 
tool to soften the harshness of the lashes by sweeping a thin layer of color over them. You may also notice that we brought the photo back into Liquify to create the appearance of higher cheekbones.


Step 6
Filling out the eyebrows with a pencil or powder is usually an essential step that all girls remember. Eyebrows are so important because they frame the face and ultimately clean up our look. Using the Stamp Tool, carefully stamp along the shape of the eyebrows to create the base. Select the Brush Tool to finish them. First hit the Alt key to collect the color of the brow then use a hard, low opacity round brush to make realistic strokes of hair along the brow. Use the Eraser to clean them up. If one brow looks better than the other, use the Lasso Tool to select the better brow and copy and paste it onto a new layer. Go to Edit > Transform > Flip Horizontal, then right-click and select Free Transform to position into place.


Step 7
Select a pale area of skin with the Eyedropper. Use both the Brush and Stamp Tools to paint a soft pale color around the bridge of the nose and underneath the eyes at an angle all the way up to the top of the cheekbone. In real life this step would be considered “concealer.” It helps to brighten up the under eye area and mask any overlooked discoloration.


Step 8
Now let’s add a little color to our subject. Use the Eyedropper to select the brow color. With the brush mode set to Soft Light, sweep the color at a low opacity along the cheekbone. Do this under the chin to create more shadow, and along the temples of the forehead. Real life makeup artists apply this same technique in order to “contour” the face. Use the Burn Tool to darken the hair towards the scalp to create fuller looking hair. You’ll see that this is also the last time we bring the photo into Liquify in order to adjust the chin and left cheek.


Step 9
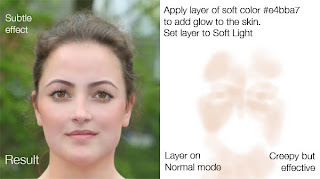
Add a new layer. With the Brush Tool set back to Normal mode, paint the color #e4bba7 along the same areas you contoured using a soft, low opacity brush. Set the layer to Soft Light, and bring down the opacity to 48%. This effect makes the model’s skin glow and her eyes pop with color.


Step 10
Add another new layer to focus on the lip color or “lipstick”. Try to define the shape of her mouth with a hard round brush. For a soft lip finish, select the color of her top lip and fill it in using a low opacity brush to balance out the color. Do the same with the bottom lip. Avoid applying any kind of lip shine effect because it 
doesn’t work with this look.


Step 11
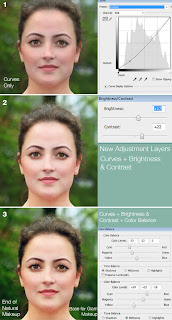
The last step to this natural makeup look is to improve the clarity and intensity of this photo. Add a New Adjustment Layer and select Curves. Make the colors of the photo more rich by bringing the curve down. Add another New Adjustment Layer for Brightness and Contrast and make the following adjustments to intensify the photo. Add a last New Adjustment Layer for Color Balance and make the following adjustments to balance everything out. This last layer also helps to intensify the actual natural makeup look.


Step 12
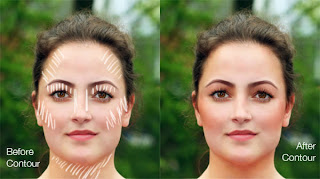
Professional makeup artists have to exaggerate glamorous makeup so that it picks up well on camera. Keep in mind these techniques are similar to the ones we just did, but instead create more drama to the Hollywood level.Add a new layer for additional contouring. Like before, use the color of the brows to work from. Add more color to the cheeks, neck, and underneath the brow with a soft round brush. Nowadays, makeup artists also contour the nose to make it appear thinner. Add the same color along the side of the nose all the way up to the brow, then set the layer to Soft Light and bring down the opacity to around 70%.


Step 13
Add a new layer and set it to Hard Light. With the same color from the brow, paint along the lid of the eyes. You can even wing it out slightly and apply a small beauty mark upon the cheek for a retro makeup look. Adjust the layer opacity until you’re satisfied, in this case it’s 88%.


Step 14
Add another new layer for the lip color. We’re still going for a matte lipstick effect because it’s more suitable for this look and we’ll be adding shine in a different way in our next step. Set the layer to Soft Light and apply a thin layer of the color #971f24 to the lips with a soft round brush. Bring down the opacity to 35%.


Step 15
Lastly, add another new layer for highlights. Highlights are often done with shimmery makeup and enhance areas by making them appear brighter, fuller, and higher. Using a bright color that’s almost white, gradually apply highlights to the brows, inner eye duct areas, upper cheek bones, and Cupid’s bow with a low opacity round brush. This effect is truly what transforms the look the most, from natural to glam.


Conclusion
No matter the look you’re going for, you can learn from actual makeup techniques to enhance the realism of your retouched photos. Have fun!


Final Image


Shaan Graphics is a premier Image Editing service provider, providing this exclusive glamour retouching service with Internationally lowest price guaranteed. Shaan Graphics Image editing service starts from $0.50 only.

Visit www.shaangraphics.com for more details


Friday, December 21, 2012

Superb Skin Airbrush Technique


Airbrush skin like a pro. In this Photoshop retouching tutorial, you’ll learn how to retouch skin like the professionals. Find out how to make skin look healthy without looking plastic or blurred.

Airbrushing Skin Photoshop Tutorial


Step 1

Open the photo into Photoshop. For this tutorial, try to use a high resolution image where you can see the skin texture.


Step 2
Create a duplicate layer and put it into a group. To do this, press Ctrl+J to duplicate the layer then Ctrl+G to place the new layer into a group. Name the group "Airbrush" and the layer "Blur". To retouch the skin, there will be two layers in the Airbrush group. The first layer we’ve created (the Blur layer) will be used to blur the skin. After that, we’ll add another layer to restore the natural skin texture.


Step 3
Have the Blur layer selected. To blur this layer, use the Surface Blur filter. This filter blurs like the Gaussian Blur filter except it can retain edge detail. We’ll need to blur the layer so that the skin is smoothed and somewhat blurry without having the edges


Here’s what my image looks looks like after the Surface Blur filter. Your image should look similar with details such as the eye intact. If the eye becomes blurry, your settings are too strong. Undo and redo the Surface Blur filter with a lower setting.


Step 4
Create a new layer and move it above the Blur layer. Name this layer "Texture" and change the blend mode to Hard Light. This layer, as the name states, will be used to add a slight texture to the skin and also adjust the skin tonality.


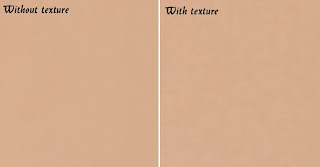
The texture created in this layer will contribute to the final results very minimally – the difference can only be easily seen zoomed in on high resolution images and varies from image to image. Even though the result is very minimal, it ensures that no area of the skin looks too smooth or plastic.

Below is an example of this. On the left, the image looks like a solid color, also known as plastic skin. The image on the right has a slight noise pattern to make the skin look more realistic.


Step 5
Make sure that you have the "Texture" layer selected. With that layer selected, press Shift+F5 or choose Edit > Fill. In the Fill tool, set the settings according to the image below. This will fill your layer with a 50% gray color.


Step 6
Open the Add Noise filter from the Filter > Noise menu. Enter in the settings shown in the image below. This will add some noise to the image that will prevent skin from looking plastic. It may look a little too sharp, but in the next step, we’ll fix this with a Gaussian Blur filter.


Step 7
Choose Filter > Blur > Gaussian Blur. Blur the layer by 1 pixel.


Step 8
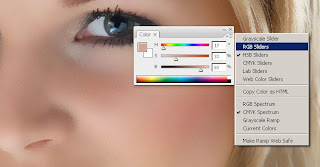
Now we’ll temporarily tint the color of this layer. First, select the Eye Dropper tool from the toolbar. Sample an area on the skin that appears to be the average skin color. You don’t have to be very precise because we will tune the color later in the tutorial. In the Color palette, click on the flyout menu below the close window button and select HSB sliders. We’ll need to see the HSB values for the next step.


Step 9
Open the Hue/Saturation tool by pressing Ctrl+U or choosing Image > Adjustments > Hue/Saturation. Check the Colorize option and adjust the hue, saturation, and lightness values to match the HSB values from the color we sampled in the previous step. For the brightness, set this to


Step 10
Select the Airbrush group in the Layers palette and add go to Layer > Layer Mask > Hide All. This will create a layer mask filled with the color black that will hide the group. With this layer mask, we’ll paint the areas were we want the skin to appear. Otherwise, this skin airbrushing effect will appear on the entire image.


Step 11
First, press D on your keyboard to set the foreground and background colors to the default black and white. Select the Brush tool and apply the settings below.


Zoom in to 100% and paint over the skin. The parts that you paint will appear smoother with a different skin tone. Don’t worry if the skin tone doesn’t look correct. This is because we didn’t pick the correct color when we used the Hue/Saturation to tint the "Texture" layer. It’s too difficult to do that without a preview, so we’ll fix that later.

When painting, you’ll need to change the brush size and hardness frequently. It would be tedious to always access the brush option menu to do this so take this as an opportunity to use hot keys. Use the following hot keys to help you with modifying the brush size and hardness:

Decrease brush size: [
Increase brush size: ]
Decrease brush softness by 25%: Shift + [
Increase brush softness by 25%: Shift + ]


When you’re done, your layer mask should have the skin areas in white and the skin should look smooth.


Step 12
Now we’re going to fix back the color and tone of the skin as we mentioned earlier in the tutorial. Select the "Texture" layer and press Ctrl+U to access the Hue/Saturation tool. Alter the settings to get a natural looking skin tone.
  • The Hue setting is usually correct. I increased it by 10 to add more yellow to it to make the appearance of the red areas less visible.
  • The Saturation setting usually needs to be reduced greatly. Adjust this until the skin tone looks natural but not too pale.
  • The Lightness setting requires slight modification. A slight change in the lightness will create big difference in how the skin blends in with the image. As you adjust the setting, you will see how sensitive this setting is. Even though it requires high precision, it is easy to tell when it is the correct setting. If it is off, it will look really off. If it is at the correct setting, it will look a lot more natural.

Step 13
Finally, we’re going to restore the skin details. Choose Image > Apply Image. Use the settings below.


The reason why we’re applying data from the Red channel is because it contains the least skin imperfections. The image below shows the difference in the channels. The red channel hides many of the skin imperfections that are visible in the green and blue channel.


Final Results
Here’s the final results after applying this airbrushing technique. In the image below, you can see how smooth the skin looks. Because the image below has been downsized to fit into this tutorial, it may look slightly plastic. However, when zoomed in, the texture is clearly visible.


This is a crop of an area zoomed in 100%. The tiny skin bumps are still visible. Even near the bottom right of the image, it still looks natural because of the "Texture" layer that we added. Without that layer, that area would appear as a solid color with no noise.


And as usual, here are the before and after images.


Shaan Graphics is a premier Image Editing service provider, providing this exclusive glamour retouching service with Internationally lowest price guaranteed. Shaan Graphics Image editing service starts from $0.50 only.

Visit www.shaangraphics.com for more details


Thursday, December 20, 2012

Portrait Retouching for Beginners

This tutorial shows a couple of simple techniques you can use to enhance your portraits. I will focus on retouching the skin, the eyes, and the teeth (whitening). To follow this tutorial, you must already know some Photoshop basics: working with layers, making simple selections, and using basic tools.


Step 1: general adjustments

As with any photograph, before you get into detailed retouching you should fix the general flaws: in lighting. 
In this case, our image has an obvious overexposure problem on the girl’s blouse, but this is beyond the scope of this tutorial, where we will focus only on the face
Let’s open the shadows a little: go to Image > Adjustments > Shadows/Highlights and fill in the settings from the image below.


We recovered more details from the shadows, but we lost the depth and the picture appears flat. Go to Image > Adjustments > Exposure and fill in the settings below.This way we get some depth in the shadows (but don’t overdo it, especially on low resolution images, because you will easily blocky areas of plain black).


Next, let’s adjust the Curves to obtain a better contrast and more volume (Ctrl + M and draw a curve like in the picture below).


The picture already looks much better than the original, so let’s take it further into the retouching.

Step 2: cleaning the skin

Cleaning the skin is usually done with a combination of the clone tool and the healing brush. The main difference between the two is that the healing brush preserves the texture of the skin better. The clone tool keeps the texture exactly only when used with a hard-edged brush, which is not something you want to do when retouching the skin. The healing brush doesn’t work all the time (especially in areas close to edges ), that’s why the best thing to do is to use the combination with the clone tool.

When retouching skin, you want to keep as much of the texture as possible. Some beginners love to use the blur tool (or even a filter like Surface Blur) to smooth the skin, but this will only give it a plastic, artificial look. Also, when retouching areas like the shadows under the eyes, or wrinkles – don’t overdo it! It’s best to keep your retouching into a separate layer so you can adjust the opacity and find the most natural look.

So, create a new layer (Ctrl + Alt + Shift + N) on top of your background and hit the J key for your healing brush tool (or S for the cloning tool). In the options bar at the top, make sure that the Sample option is set to Current & Below. Basically, use the healing brush to clear blemishes, freckles, imperfections on skin, and use the clone tool (at low opacity, I usually start around 25-30%) to lighten the areas under the eyes, to smooth wrinkles, to soften sharp shadow edges. In our case, the model’s skin is not too bad, so the retouching will be minimal.

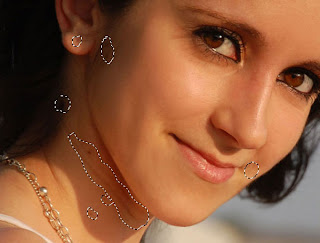
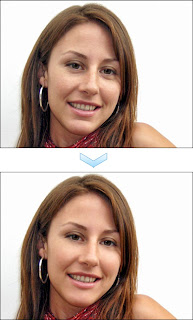
Clean up the acne marks spot by spot, the freckles on her nose and the loose strands of hair with the healing brush. Then lighten up the shadows under the eyes with the clone tool, on a separate layer. I used a soft brush around 20 px large, at 20%. While at it, soften the line of the shadow under her chin. Then, on a separate layer, with the healing brush, try to bring back some of the texture of the skin. The advantage of having these retouchments on separate layers is that you can erase parts you don’t want and alter the opacity so you can get the most natural look. Here’s my result:


Step 3: brightening the eyes

Bringing out the eyes will make the difference between a dull portrait and a one that captivates the viewer. Professional photographers use careful lighting to catch the vibrancy of the eyes, but you can use your retouching skills to enhance the glance of your subject.

In our portrait here, the model’s eyes are pretty much shaded and in desperate need for some brightness. However, keep in mind that, again, moderation is key: do not whiten too much the white of the eyes because it will look unnatural!

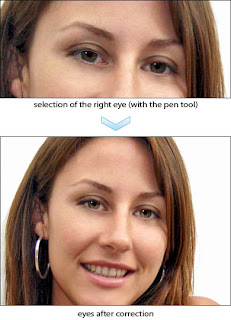
Let’s start by selecting each eye from the original picture. You can use the polygonal lasso, although I recommend for most selections the pen tool. If you use the pen tool, outline the shape of the eye and then load the shape as a selection and, while on the background layer, hit CTRL + J to copy the selection in a new layer. If you use the lasso, hit CTRL + J when you’re done (same effect as above). Do the same for each eye.

(For the basic use of the pen tool for selections – without knowing Bezier curves – see a tutorial I wrote a while ago and posted on my fine art website: Cutting and blending techniques.

We will use these layers to adjust the white of the eyes. But before that, let’s select the pupils and paste the on their own layers (on top of the eyes layers). You can select them from the original layer or from the new eyes layers. Don’t forget to label your layers accordingly and to organize them in groups!

Now, for each of the eyes layer, go Image > Adjustments > Brightness & Contrast and set the Brightness to +20. You may notice now some red specks on the whites, which you can clone out with the clone tool.

Now, select the pupils’ layers and repeat the Brightness & Contrast adjustment, but this time with much higher parameters (brightness 90/ contrast 60, or just experiment until you like the result).

The eyes have improved a lot, but we got some red artifacts is the pupils, which we can get rid of easily. Select the layer of the left pupil and hit Ctrl + U to bring up the Hue/Saturation dialog. From the Edit drop-down choose Reds and use the following settings: Hue: +15, Saturation: -32, Lightness: 0. This way, we shifted the reds towards a green hue. Hit Enter to apply the settings. Then, select the other pupil’s layer and hit Ctrl + Alt + U. This combination will bring up the Hue/Saturation dialog with the settings last used already filled in, so you can just hit Enter and you’re done!

(Tip: use the Alt key in combination with other shortcuts for Adjustments or even for Filters, to start with the settings last used instead of the default settings).


There are more enhancements that can be done to the eyes (like painting in catch lights and shadows), but for now we’ll stop here and move on to the next step.

Step 4: whitening the teeth

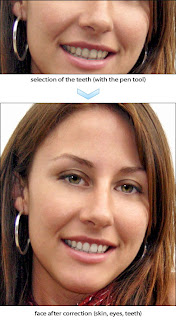
Unless you’ve just come from a whitening session at your dentist, anyone could use some post-processing teeth whitening. There is an easy way to give this girl a brighter smile: select the teeth and paste them into their own layer. I useed, as usual, the pen tool (but you can use the polygonal lasso if you wish).

Once you have the teeth in their own layer, hit Ctrl + U just like before and select to edit the Yellows this time. You don’t want to reduce the Saturation (it will only make them look grey), but to increase the Lightness (+45). Since they still look too dark, select the Reds in the Edit dropdown and increase the Lightness to +30. Be careful not to make them look grey! Hit Ok and then go to Image > Adjustments > Brightness/Contrast and up the Brightness to +12. Then hit S to grab your clone tool and clone out the too bright spots (zoom in closely).


Step 5: further improvements

There’s much more that you could do to improve this portrait, but it extends beyond the scope of this tutorial. For instance, her skin appears too dark on the lower half of the photo. Then, I would get rid of the shadow on the wall that you can see along her arms. In fact, a completely new background would be even better. The hot spot on her shirt could be fixed by cloning fabric from the other side. The scarf could use a more saturated red. And so on… We’re a long way from a magazine cover, but also a long way from the initial shot.


Shaan Graphics is a premier Image Editing service provider, providing this exclusive glamour retouching service with Internationally lowest price guaranteed. Shaan Graphics Image editing service starts from $0.50 only.

Visit www.shaangraphics.com for more details


Wednesday, December 19, 2012

Basic Portrait Retouching in Photoshop


In this tutorial, I’ll show you several quick and easy techniques for retouching portraits using Adobe Photoshop.

There are entire books written on retouching portraits—many books in fact. This tutorial does not aim to substitute all that information. Rather than spending a lot of time on many individual steps in retouching photos, this tutorial aims to provide a quick overview of several techniques.

We’ll be working with this photograph:


We won’t focus on theory so much as applying different tools from here on out.

Arrange your workspace


For the most efficient workflow, it may be worth your while to get in the habit of arranging your workspace. Photoshop has many palettes, but we are only going to use the toolbar palette, Layers and the history palette.

You can save your workspace as a preset for quick editing in future jobs.

History log
Go to Edit->Preferences-> Performance and set the history states to 50.This will give you more flexibility as you can go back and see your progress and/or improve any of the techniques you have used.

If you find Photoshop running much slower, revert to your default setting.

Molding Features with Liquify

The Liquify tools are incredibly useful in molding features without destroying too much information. Watch how I apply it do several areas of the model below:


First I open the Liquify panel ( Filter->Liquify ), choose  the Forward Warp Tool and use it to push the jaw a bit inward. I repeat this process with the neck. For areas of the models face I want to enlarge, I can use the bloat tool and if I want to reduce the size of something, I can use the pucker tool.


These are the settings I’ve used for the Forward Warp Tool. The brush size can vary of course depending on the region you want to modify.For the jaw region I’ve used a brush size of 238 and for the lips somewhere around 130.However,don’t take these values for granted.

Each photo, and each part of a photo will need careful consideration in tool settings. Since this is a larger photo, we use larger brush sizes.

Cleaning Up Skin with the Clone Stamp


There are many ways to clean skin in Photoshop. Here is a super easy way using the Clone Stamp Tool.


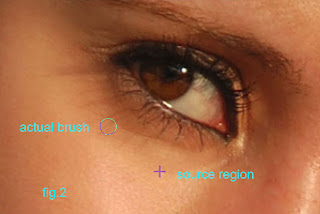
Zoom in to a level where you are comfortable and you can see the details. Now look for a region of skin with a similar color range to the one you want to fix. Usually I choose an area which is close to the part I want to fix ( fig2 ) . Choose the Clone Stamp tool and select the source region (hold alt to select it ) and set the opacity to somewhere around 30%. The key is to use low opacity values but many , many strokes rather than few strokes and a high opacity value. By using this technique , you will preserve the details and not wash out the skin.

I have used the Clone Stamp tool to get rid of the wrinkles , especially those near the corner of the lips and the ones around the bottom part of the eyes. Be careful not to overuse the Clone Stamp tool or else you will lose the skin texture and create flat planes on your face. Fake looking skin is a common error in the practice of retouching photos.

Tip: create snapshots to keep track of your progress and also zoom out often to have an overview of what you have done so far.

Get rid of Wrinkles with the Healing brush


Use the Healing Spot Brush to correct small skin issues like independent blisters or wrinkles. Set the type brush to proximity match for more accurate results.

We’re not going to dive into any theory or arguments over best practices here, but be sure to keep in mind that wrinkles are natural in skin. Don’t get rid of too much.

Quick Tips for Eyes & lips


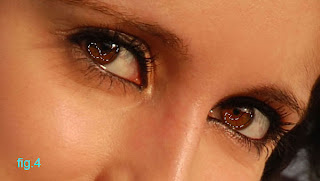
The Dodge and Burn tools are useful in emphasizing the eyes and lips in a portrait. I Select the Dodge tool, set the exposure to 12% and “dodge” the areas indicated in Fig4. This will lighten the colors. To create contrast ( thus we’ll create emphasis on the eyes) we need to use the Burn tool with an exposure of 12%. "Burn" the pupil, the outer part of the iris, the eyelashes and the area under the eyebrows.


Also, I use the Dodge tool to accentuate the highlights from the lips (Fig5.)

Hair Styling


Taking care of rebellious hairs can be achieved with the Clone Stamp Tool once more.

I use the Clone Stamp Tool in this portrait to get rid of forehead hair and some of the hair near the model’s ear.

Adding a Touch of Contrast with Levels


Sometimes, you may wish to add just a bit more contrast to your portrait shot. This can be done very quickly with Levels.

Go to Image->Adjustments-> Levels ( CTRL + L ) and set the values as seen in the pic above. This darkens the shadows and boosts the highlights.

Before & After


You can take a closer look yourself from the source files if you wish. Good luck!

Shaan Graphics is a premier Image Editing service provider, providing this exclusive glamour retouching service with Internationally lowest price guaranteed. Shaan Graphics Image editing service starts from $0.50 only.

Visit www.shaangraphics.com for more details