Saturday, January 12, 2013

Photoshop Skin Retouching

The skin retouching is composed of three steps:
  • First, the impurities of skin are removed.
  • Second, balance the color  differences of skin
  • Third, the skin is smoothened, taking into account the natural skin pores.
The third step is the most challenging,  as we have to soften the rough texture of skin while keeping the skin pores still present to give it a natural look. The skin retouching is recommended if pimples, spots and light reflections let the skin looks restless and unclean. The effect of the retouching is silky-smooth skin that will look even more natural.


In this tutorial I will show you, how skin retouching can result in silky-smooth skin with a fine pore structure.


1. Step: Remove skin blemishes
The patch tool and healing brush are ideal for touching up blemishes.

The Healing Brush tool works like the Clone Stamp. Choose areas with the Alt key and then as a source of focused areas of the skin can be processed. The difference is that Clone Stamp is to compensate for brightness, contrast, hue and saturation. Thus a source of healing brush forgives variations in color consistency of the goal area, etc.


The Patch tool is a hybrid of lasso tool and healing brush tool. A source is thereby selected by the tool, and then slid a better range in the selection.


Which tool is exactly what?

The Patch tool can quickly touch up the larger areas such as wrinkles. The repair tool is intuitive, because the pre-selected area is not necessary. This can edit more small and detailed parts of the image.

Whether you want to remove freckles from the picture, always depends on the client. For pure post-processing of photos for model / private, definitely consult with the person to lead, because track freckles, scars and moles also part of the external identity. Small bumps are no problem and can be removed safely. In this example, I show how the Healing brush is used to remove the small skin abnormalities.

With Alt I choose in the adjacent area of skin to be treated to provide a clean area. With a small, soft brush then I fix the impure skin. The spots disappear very quickly and easily.

So I go by the face and remove the disturbing elements.


2. Skin colors converge
The skin may appear restless when isolated areas are darker or lighter than others. The balance, makes the skin look more vital and clean.

It would be ideal if  I color skin irritations in the reinforcing effect, so I have a perfect measure for compensation. The quickest way is that I create a new adjustment layer – dynamics and move both controls (dynamics and saturation) to approximately + 80.

Dynamics  adjustment layer is available in Photoshop CS4 only. In Photoshop CS5, it’s  named as Vibrance.  For previous versions, you can use Channel Mixer Adjustment Layer in Monochrome mode to get the same.

It all depends on the attitude of regulators such as the face is dark already. The darker face, the less I move the slider to the right.


Now I see clearly where there are imbalances in color.


I put a new layer with 50% gray in Overlay mode, tick the checkbox “Fill with Overlay-neutral color”. 50 percent gray is almost the original value.


Now pick a soft brush and very low opacity (5-15 percent). Choose dark gray as foreground color and light gray as a background color. You can quickly change the colors with X so that the skin offsets the shadows and highlights.

Quickly use the brush to remove all the skin freckles and adjusts the skin shadows and highlights as follows.


Right now, the following happens – you can see it in Normal mode:


Now, the dynamics(Vibrance) adjustment layer can then be deleted or deactivated.


The adjustment layer dynamics are there only in Photoshop CS4. Alternatively, to do this in previous versions of CS4, choose a channel mixer from the adjustment layer. Tick a monochrome and reduce the red and green channel and increase the blue channel. You will get a similar effect in black and white similar to the dynamics/Vibrance.


3. Making Smooth Skin while keeping the pores
3.1 – The classic: Blur and reduce opacity 

The Gaussian blur is there for a very long time in Photoshop, and it was so early for retouching purposes, particularly for smoothing skin. With this filter, a person can brush up on some easy way.

Press Ctrl + Shift + Alt + E, it will copy all the visible layer to a new layer and convert it into a Smart Object. Smart Object has the advantage that I can always change the degree of blur.

Now I choose menu Filter> Blur> Gaussian Blur.


I fill the Smart Filter mask with black color, so that no area is covered by soft focus. Then I paint with a soft white brush that should be blurred with medium coverage from all parts of the skin  . I save the edges of the image especially hair, eyes and mouth.


Thus I have softened the rough skin structures without changing the entire structure. Now I reduce the layer opacity to between 40 and 70 percent.  By reducing the opacity of the layer, skin pores get back into the picture. If necessary I can customize filter for the smart blur .


The Gaussian blur of skin can definitely be used for smoothing. However, this process may result in loss of detailed information, stand out even at high resolutions. For a fine skin retouching, combination of other tools and filters is recommended.

3.2 – Blurring and sharpening

In the normal blur, reduce the opacity of the layer mask, the softness of the skin and the visibility of pores with a controller or in a balanced. The soft-colored skin, the less structures remain visible from the pores.

Another popular method combined with the skin smoothing is blur with a sharpening.

Ctrl + Alt + Shift + E  to create a new layer merging all the visible layer.


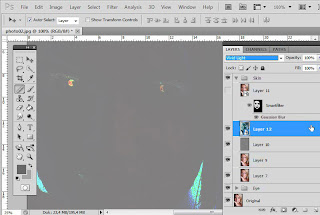
Now I choose the mode to Vivid Light and inverse the layer content with Ctrl + I. Convert the layer into a smart object.


Now, as we have converted the layer into a smart object, we can adjust the values for high pass and blur filters  any time, which we are going to apply now. And then we understand what happened or what was done in this level.

Now, choose a gaussian blur with value of 3-4 pixels, the pores now become visible again. Click OK to confirm.


Apply high-pass filter, 22 to 30 pixel radius to reinforce the edges of the image.


The high pass filter is often used for sharpening by the level of a 50-percent gray level, it sharpens the contours and used with Overlay mode with the existing image. Here, this effect is reversed. The high pass converts the image back from 50-percent gray in to normal view.


With the radius of the blur, I was able to smooth the rough skin structures within the specified radius, ie, adjust pixel radius, and the pores with the high-pass filter to work out.


The advantage of this technique over the classical softening is that I can do smoothing even to the highlight of the pores.

Before-after comparison of the skin retouching:


Shaan Graphics is a premier Image Editing service provider, providing this exclusive glamour retouching service with Internationally lowest price guaranteed. Shaan Graphics Image editing service starts from $0.50 only.

Visit www.shaangraphics.com for more details


Saturday, December 22, 2012

Realistic Makeup Application in Photoshop

Final Product What You'll Be Creating


It’s true. Women spend a lot of time getting ready. That is because the makeup application process is quite tedious and time-consuming. The physical process of 
applying makeup involves concealing blemishes and painting the face with rich colors. In many ways, the process mirrors that of digital retouching techniques. In this 
tutorial, we will explain how to apply makeup digitally using many of the same techniques that women use to apply physical makeup to their own faces. Let’s get 
started!


Some Things To Consider Before You Start

  • Retouch according to what best compliments your subject’s specific features.
  • Make sure the colors are synonymous with the mood and aesthetic you’re shooting for.
  • Decide what to add or subtract from preexisting makeup.
  • Always improve the clarity and intensity of your work through layer adjustments.
Step 1
Natural makeup is all about creating flawless looking skin. So make an assessment of your photo. In this particular case we have a stock photo of a woman with virtually no visible makeup on except for mascara. This photo is perfect because we won’t have to create false lashes later on. The main makeup concepts you’ll be learning today are concealing, contouring, and highlighting. Feel free to make literal or mental notes of which areas to correct.


Step 2
Duplicate the original photo layer and place into a group. This is where all the makeup changes will occur; you can flip back to the original photo at any time to compare the changes you’ve made. Next go to Filter > Liquify and begin adjusting the structure of your model’s face. Use the Forward Warp Tool to create a slimmer appearance by bringing in the sides of her cheek, forehead, and jaw line.


Step 3
We will continue using the Liquify option throughout this tutorial, so feel free to make adjustments to the facial structure until you’re satisfied. Currently the model’s expression seems a little down, so we can alter it by lifting crucial areas of her face such as the corners of her mouth, her eyebrows, and the corners of her 
eyes. Now her expression is more pleasant. You can also quickly straighten her nose by pulling it to the right.


Step 4
Typically, people use the Bloat Tool to create fuller lips, but in excess it can lead to an unnatural bulge. For subjects with thinner lips, think about using the Forward Warp Tool instead to pull the lips into a more natural shape.


Step 5
Use the Clone Stamp Tool at a low opacity to softly erase spots, lighten dark circles, and lessen wrinkles by sourcing nearby areas. It’s almost like a regular brush, so using it correctly can create a subtle effect of soft, clear skin. This is similar to the purpose of liquid foundation which helps to even out skin tone. Use this 
tool to soften the harshness of the lashes by sweeping a thin layer of color over them. You may also notice that we brought the photo back into Liquify to create the appearance of higher cheekbones.


Step 6
Filling out the eyebrows with a pencil or powder is usually an essential step that all girls remember. Eyebrows are so important because they frame the face and ultimately clean up our look. Using the Stamp Tool, carefully stamp along the shape of the eyebrows to create the base. Select the Brush Tool to finish them. First hit the Alt key to collect the color of the brow then use a hard, low opacity round brush to make realistic strokes of hair along the brow. Use the Eraser to clean them up. If one brow looks better than the other, use the Lasso Tool to select the better brow and copy and paste it onto a new layer. Go to Edit > Transform > Flip Horizontal, then right-click and select Free Transform to position into place.


Step 7
Select a pale area of skin with the Eyedropper. Use both the Brush and Stamp Tools to paint a soft pale color around the bridge of the nose and underneath the eyes at an angle all the way up to the top of the cheekbone. In real life this step would be considered “concealer.” It helps to brighten up the under eye area and mask any overlooked discoloration.


Step 8
Now let’s add a little color to our subject. Use the Eyedropper to select the brow color. With the brush mode set to Soft Light, sweep the color at a low opacity along the cheekbone. Do this under the chin to create more shadow, and along the temples of the forehead. Real life makeup artists apply this same technique in order to “contour” the face. Use the Burn Tool to darken the hair towards the scalp to create fuller looking hair. You’ll see that this is also the last time we bring the photo into Liquify in order to adjust the chin and left cheek.


Step 9
Add a new layer. With the Brush Tool set back to Normal mode, paint the color #e4bba7 along the same areas you contoured using a soft, low opacity brush. Set the layer to Soft Light, and bring down the opacity to 48%. This effect makes the model’s skin glow and her eyes pop with color.


Step 10
Add another new layer to focus on the lip color or “lipstick”. Try to define the shape of her mouth with a hard round brush. For a soft lip finish, select the color of her top lip and fill it in using a low opacity brush to balance out the color. Do the same with the bottom lip. Avoid applying any kind of lip shine effect because it 
doesn’t work with this look.


Step 11
The last step to this natural makeup look is to improve the clarity and intensity of this photo. Add a New Adjustment Layer and select Curves. Make the colors of the photo more rich by bringing the curve down. Add another New Adjustment Layer for Brightness and Contrast and make the following adjustments to intensify the photo. Add a last New Adjustment Layer for Color Balance and make the following adjustments to balance everything out. This last layer also helps to intensify the actual natural makeup look.


Step 12
Professional makeup artists have to exaggerate glamorous makeup so that it picks up well on camera. Keep in mind these techniques are similar to the ones we just did, but instead create more drama to the Hollywood level.Add a new layer for additional contouring. Like before, use the color of the brows to work from. Add more color to the cheeks, neck, and underneath the brow with a soft round brush. Nowadays, makeup artists also contour the nose to make it appear thinner. Add the same color along the side of the nose all the way up to the brow, then set the layer to Soft Light and bring down the opacity to around 70%.
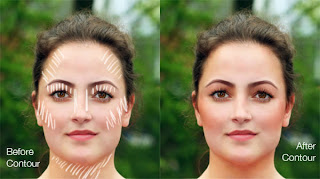

Step 13
Add a new layer and set it to Hard Light. With the same color from the brow, paint along the lid of the eyes. You can even wing it out slightly and apply a small beauty mark upon the cheek for a retro makeup look. Adjust the layer opacity until you’re satisfied, in this case it’s 88%.


Step 14
Add another new layer for the lip color. We’re still going for a matte lipstick effect because it’s more suitable for this look and we’ll be adding shine in a different way in our next step. Set the layer to Soft Light and apply a thin layer of the color #971f24 to the lips with a soft round brush. Bring down the opacity to 35%.


Step 15
Lastly, add another new layer for highlights. Highlights are often done with shimmery makeup and enhance areas by making them appear brighter, fuller, and higher. Using a bright color that’s almost white, gradually apply highlights to the brows, inner eye duct areas, upper cheek bones, and Cupid’s bow with a low opacity round brush. This effect is truly what transforms the look the most, from natural to glam.


Conclusion
No matter the look you’re going for, you can learn from actual makeup techniques to enhance the realism of your retouched photos. Have fun!


Final Image


Shaan Graphics is a premier Image Editing service provider, providing this exclusive glamour retouching service with Internationally lowest price guaranteed. Shaan Graphics Image editing service starts from $0.50 only.

Visit www.shaangraphics.com for more details


Friday, December 21, 2012

Superb Skin Airbrush Technique


Airbrush skin like a pro. In this Photoshop retouching tutorial, you’ll learn how to retouch skin like the professionals. Find out how to make skin look healthy without looking plastic or blurred.

Airbrushing Skin Photoshop Tutorial


Step 1

Open the photo into Photoshop. For this tutorial, try to use a high resolution image where you can see the skin texture.


Step 2
Create a duplicate layer and put it into a group. To do this, press Ctrl+J to duplicate the layer then Ctrl+G to place the new layer into a group. Name the group "Airbrush" and the layer "Blur". To retouch the skin, there will be two layers in the Airbrush group. The first layer we’ve created (the Blur layer) will be used to blur the skin. After that, we’ll add another layer to restore the natural skin texture.


Step 3
Have the Blur layer selected. To blur this layer, use the Surface Blur filter. This filter blurs like the Gaussian Blur filter except it can retain edge detail. We’ll need to blur the layer so that the skin is smoothed and somewhat blurry without having the edges


Here’s what my image looks looks like after the Surface Blur filter. Your image should look similar with details such as the eye intact. If the eye becomes blurry, your settings are too strong. Undo and redo the Surface Blur filter with a lower setting.


Step 4
Create a new layer and move it above the Blur layer. Name this layer "Texture" and change the blend mode to Hard Light. This layer, as the name states, will be used to add a slight texture to the skin and also adjust the skin tonality.


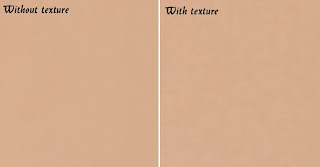
The texture created in this layer will contribute to the final results very minimally – the difference can only be easily seen zoomed in on high resolution images and varies from image to image. Even though the result is very minimal, it ensures that no area of the skin looks too smooth or plastic.

Below is an example of this. On the left, the image looks like a solid color, also known as plastic skin. The image on the right has a slight noise pattern to make the skin look more realistic.


Step 5
Make sure that you have the "Texture" layer selected. With that layer selected, press Shift+F5 or choose Edit > Fill. In the Fill tool, set the settings according to the image below. This will fill your layer with a 50% gray color.


Step 6
Open the Add Noise filter from the Filter > Noise menu. Enter in the settings shown in the image below. This will add some noise to the image that will prevent skin from looking plastic. It may look a little too sharp, but in the next step, we’ll fix this with a Gaussian Blur filter.


Step 7
Choose Filter > Blur > Gaussian Blur. Blur the layer by 1 pixel.


Step 8
Now we’ll temporarily tint the color of this layer. First, select the Eye Dropper tool from the toolbar. Sample an area on the skin that appears to be the average skin color. You don’t have to be very precise because we will tune the color later in the tutorial. In the Color palette, click on the flyout menu below the close window button and select HSB sliders. We’ll need to see the HSB values for the next step.


Step 9
Open the Hue/Saturation tool by pressing Ctrl+U or choosing Image > Adjustments > Hue/Saturation. Check the Colorize option and adjust the hue, saturation, and lightness values to match the HSB values from the color we sampled in the previous step. For the brightness, set this to


Step 10
Select the Airbrush group in the Layers palette and add go to Layer > Layer Mask > Hide All. This will create a layer mask filled with the color black that will hide the group. With this layer mask, we’ll paint the areas were we want the skin to appear. Otherwise, this skin airbrushing effect will appear on the entire image.


Step 11
First, press D on your keyboard to set the foreground and background colors to the default black and white. Select the Brush tool and apply the settings below.


Zoom in to 100% and paint over the skin. The parts that you paint will appear smoother with a different skin tone. Don’t worry if the skin tone doesn’t look correct. This is because we didn’t pick the correct color when we used the Hue/Saturation to tint the "Texture" layer. It’s too difficult to do that without a preview, so we’ll fix that later.

When painting, you’ll need to change the brush size and hardness frequently. It would be tedious to always access the brush option menu to do this so take this as an opportunity to use hot keys. Use the following hot keys to help you with modifying the brush size and hardness:

Decrease brush size: [
Increase brush size: ]
Decrease brush softness by 25%: Shift + [
Increase brush softness by 25%: Shift + ]


When you’re done, your layer mask should have the skin areas in white and the skin should look smooth.


Step 12
Now we’re going to fix back the color and tone of the skin as we mentioned earlier in the tutorial. Select the "Texture" layer and press Ctrl+U to access the Hue/Saturation tool. Alter the settings to get a natural looking skin tone.
  • The Hue setting is usually correct. I increased it by 10 to add more yellow to it to make the appearance of the red areas less visible.
  • The Saturation setting usually needs to be reduced greatly. Adjust this until the skin tone looks natural but not too pale.
  • The Lightness setting requires slight modification. A slight change in the lightness will create big difference in how the skin blends in with the image. As you adjust the setting, you will see how sensitive this setting is. Even though it requires high precision, it is easy to tell when it is the correct setting. If it is off, it will look really off. If it is at the correct setting, it will look a lot more natural.

Step 13
Finally, we’re going to restore the skin details. Choose Image > Apply Image. Use the settings below.


The reason why we’re applying data from the Red channel is because it contains the least skin imperfections. The image below shows the difference in the channels. The red channel hides many of the skin imperfections that are visible in the green and blue channel.


Final Results
Here’s the final results after applying this airbrushing technique. In the image below, you can see how smooth the skin looks. Because the image below has been downsized to fit into this tutorial, it may look slightly plastic. However, when zoomed in, the texture is clearly visible.


This is a crop of an area zoomed in 100%. The tiny skin bumps are still visible. Even near the bottom right of the image, it still looks natural because of the "Texture" layer that we added. Without that layer, that area would appear as a solid color with no noise.


And as usual, here are the before and after images.


Shaan Graphics is a premier Image Editing service provider, providing this exclusive glamour retouching service with Internationally lowest price guaranteed. Shaan Graphics Image editing service starts from $0.50 only.

Visit www.shaangraphics.com for more details