Monday, November 12, 2012

Create Masks of Transparent Elements in Photoshop

You will be creating Mask of Transparent Elements in Photoshop and the final result will look like the following:


Step One
One of the major advantages of having access to the separate channels in Photoshop is the ability to make selections. You can use individual channels to make different selections in the image. When you want to select a specific item in the image, use the color channels that provide the greatest contrast around the edges of that item. So let’s start the initial planning phase.


Step Two
This is the original image. Though this is a CMYK image, same process will work in case of an RGB image. Only difference will be in the Channels panel. Instead of four color channels and one composite channel, there will be three color channels and one composite channel in the RGB image. The objective of this tutorial is to remove the black portion but to keep the glass, water, bubbles and the reflection below the glass. So we can use it on any other background (Solid color or photo). For this tutorial we will use Apply Image command (Image > Apply Image).


Step Three
The Apply Image command lets you blend one image’s layer and channel with a layer and channel of the active image. But remember the pixel dimensions of the images must match for image names to appear in the Apply Image dialog box. But here we are not using two images. We are blending the black channel copy with the black channel copy itself. But the power of the Apply Image is hiding within the Target section. Here you can specify a blend mode or blending type which you want to use during the Apply Image blend.


Step Four
Open the file in Photoshop. Then in the Channels panel examine the channels for a channel with good contrast. Finding a channel with good contrast is essential for good selection.


Step Five
Here the black channel is showing good contrast between the glass and the background.


Step Six
Duplicate the black channel by dragging it over the ‘create new channel’ icon below the Channels Panel. You can also right click on the black channel and select duplicate channel.


Step Seven
Then select the black channel copy and Image > Apply Image.


Step Eight
First blend one time with Multiply mode to increase black and in this process convert from the background any area to black which is gray. But reduce the opacity (within the Target section) amount to 50% to create a blend which is not too strong. Otherwise we might remove some white areas, as they are not pure white.


Step Nine
The Multiply blend mode looks at the color information in each channel and multiplies the base color by the blend color. The resultant color is always a darker color. Multiplying any color with black produces black. By using the Multiply blend mode we are removing any grey portion from the background.


Step Ten
Then blend two times with Overlay blend to increase white. Now we can easily select the white area. Our goal here is to create an effective, fast and acceptable mask with this process. This time use 100% Opacity in the blending area.


Step Eleven
The Overlay blend mode multiplies or screens the colors, depending on the base color. The base color is not replaced, but mixed with the blend color to reflect the lightness or darkness of the original color. White areas become brighter and black areas become darker. By using the Overlay blend mode we are increasing the strength of the white portion as we want to keep the white portion but mask out the black portion in the final image.


Step Twelve
You can still tweak the black channel copy by using a brush and paint with white or black color. Paint with white to keep image areas and paint with black to remove or mask out portion. White denotes opaqueness and black denotes transparency within a channel.


Step Thirteen 
Load the black channel copy as a selection by either Command/Ctrl-click on the channel or click the first button below the channels panel, which is load channel as a selection.


Step Fourteen
Then go to the Layers panel and duplicate the background layer by dragging it over the create new layer button below the layers panel. You can also right click on the background layer and select Duplicate Layer.


Step Fifteen
Then target the new layer (Background copy) by left clicking on it once. Selection still active, click on mask icon below the Layers panel to create a mask.


Step Sixteen
Now create a new blank layer below and fill it with either red or blue. Now check the quality of the mask. You will find that within the mask there are few grey areas.


Step Seventeen
There are two processes to remove this unwanted grey area. Although first process described below will give you the best output, but still let’s explore both of them.


Step Eighteen
Process 1: Change the blend mode of background copy layer to Lighten in order to remove grey area.


Step Nineteen
Lighten blend mode looks at the color information in each channel and pixels darker than the blend colors are replaced, and pixels lighter than the blend color do not change. As a result dark grey pixels removed.


Step Twenty
Process 2: Command/Ctrl-click on the background copy mask thumbnail to load the mask as a selection. You can also load the selection from the black channel copy.


Step Twenty one
Then click on the Adjustment layer icon below the Layers panel.


Step Twenty two
This will create a new Levels Adjustment layer.


Step Twenty three
Then in the levels dialogue box first drag the midtone input slider (middle one) and then the highlight input slider (right one) towards left to remove grey area or rather converts grey into white.


Step Twenty Four
After applying Lighten blend mode, if you check closely you will find that there are a few broken portions within the white area. You can use the Clone Stamp Tool to fix these areas.


Step Twenty Five
That’s it. You can use the same technique to select complex objects with variable level of transparency. Below is the before and after version.


Step Twenty six
This is the final version.


Tutorial Made by Shaan Graphics.

Shaan Graphics is a premier Image Editing service provider, providing this exclusive Transparent masking service with Internationally lowest price guaranteed. Shaan Graphics Image editing service starts from $0.50 only.

Visit www.shaangraphics.com for more details

Saturday, November 10, 2012

Photoshop Image Background Removing Tutorial

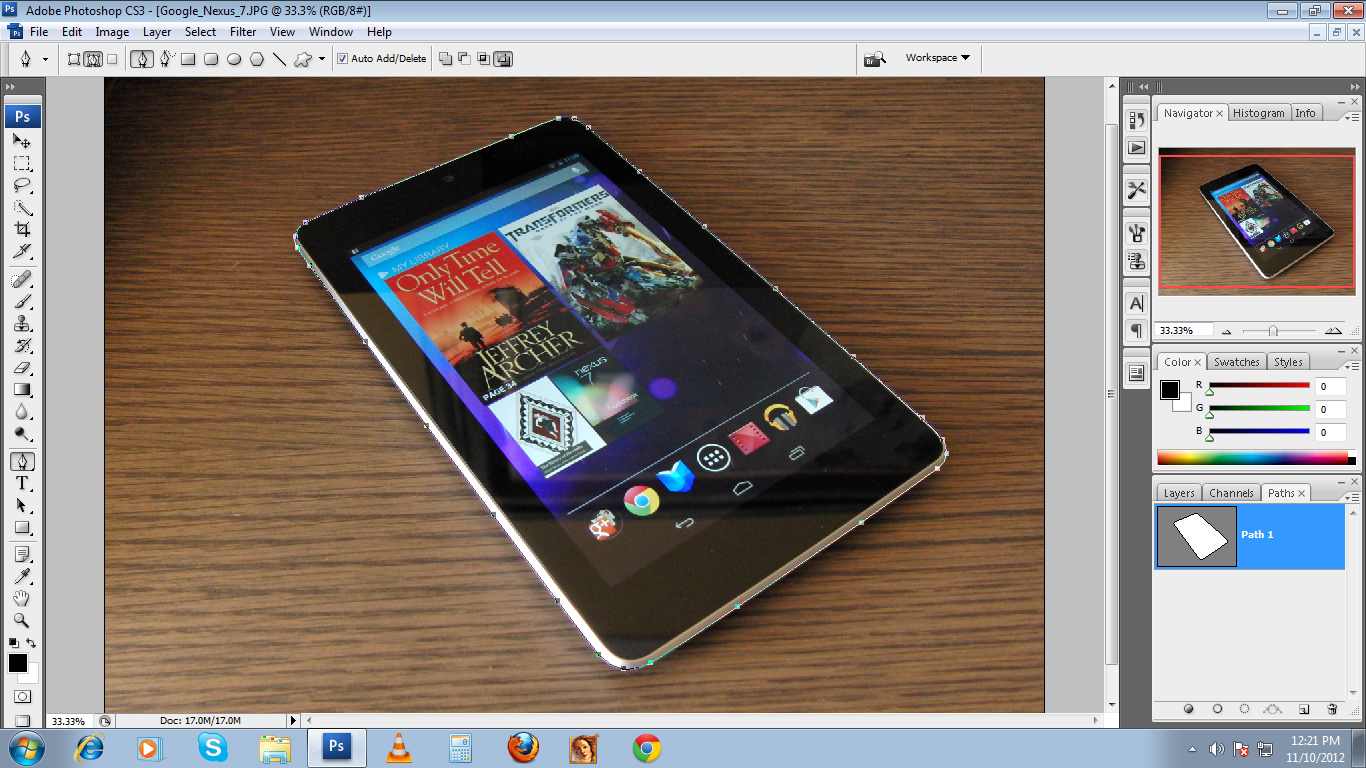
First you have to open up a image and zoom in a little for better view. You have to match the curves and angles of your object as exactly as possible in order to start Clipping Path. 


Select the Photoshop Pen tool.


 Now pick a spot on the edge of your image object.


Move the pen around to the edge of the object 


Now get back to the point where you have started to make sure that entire object is outlined.


Now you will need to change the path outline into "selection" before you cut out the whole background.


Now you will see some dotted line around the object.


Now, You will need to invert the selection so that it’s actually selecting everything BUT your object.


Click on “Select” in the menu bar, and the “Inverse”.


Now simply press "delete" and your Clipping Path, Background Removing Job is Done!


Finish!


Tutorial Made by Shaan Graphics.

Shaan Graphics is a premier Image Editing service provider, providing this exclusive clipping path and background removing service with Internationally lowest price guaranteed. Shaan Graphics Image editing service starts from $0.50 only.

Visit www.shaangraphics.com for more details


Friday, November 09, 2012

Photoshop Pen Tool Guide

Functions

Pen tool : Click on the Photoshop canvas to create paths with straight segments, click on the canvas and drag to create paths with


Freehand Pen tool : Now drag to draw paths freely on to the cansas, as though using a brush.


Add Anchor Point tool : Choose a path segment to add anchor point.


Delete Anchor Point tool : Click on anchor point to remove from path.


Convert Point tool : Click on an anchor point and drag to create bezier handles where there were none, click on an anchor point with handles to a remove them.


Keyboard Shortcuts

P : Select Pen tool or Free form Pen tool, depending on which was selected most recently

The Cursors

The Pen tool takes on different forms depending on what you’re doing when youre using it. Each one intuitively makes you aware of the action you are about to perform.
(Caps Lock to toggle between pointer and cross hair in some cases)
  • Prepared to begin path
  • while midway through creating or editing a path
  • When mouse is pressed
  • Add an anchor point to path
  • Remove anchor point from path
  • When hovered over begin point of path; to close path
  • When hovered over endpoint of existing path; to continue path, or (if path is active) to edit that point
  • Prepared to convert existing anchor point
  • Freehand Pen Tool
  • Magnetic Freehand Pen Tool
  • Direct Selection Tool; Pen Tool with Command pressed
  • Path Selection Tool; Pen Tool with Command + Alt pressed
  • When hovered over canvas with Ctrl pressed; prepared for options menu

Secondary Mouse Controls (with path selected and Auto Add/Delete checked)

  1. Pen tool hover over anchor point : changes to Delete anchor point tool
  2. Pen tool hover over path segment : changes to Add anchor point tool

Keyboard Controls

  1. Hold Ctrl and click on canvas. Opens up an options menu.
  2. Hold Shift to constrain movements to 45°, 90°, 135° or 180° while creating or editing anchor points and handles.
  3. Select anchor point with Direct selection tool and click Delete. Anchor and adjoining path segments are deleted leaving two paths.
  4. Pen tool + Option (Alt): changes to Convert anchor point tool.
  5. Pen tool + Option (Alt) while editing bezier curve: splits curve (unhinges handles).
  6. Pen tool + Command whilst creating path: changes to Direct Selection tool allowing repositioning of previously drawn anchor points.

Options

The  Window > Options is usually located at the top of your screen, provides the most important options for whichever tool is selected. This is also true of the Pen Tools and their options are outlined below:
1. Presets: Allows presets to be saved for whichever tool is selected. Define the options as discussed below and save as a Preset to quickly come back to those settings later.
2. Shape Layers: while this is selected, paths created will contribute to a shape, visible within the Paths palette and within the Layers palette as a vector mask.


3. Paths: while this is selected, paths created will contribute to a path, visible within the Paths palette.


4. Fill Pixels: The third path type option, available while one of the shape tools is selected. While this is selected, paths created will become filled areas.


5. Pen Tool: Selects the Pen Tool.


6. Freehand Pen Tool: Selects the Freehand Pen Tool.


7. Rubber Band: Available from within the Pen Options dropdown while the Pen Tool is selected. Rubber Band gives a visual of the path youre about to create, without you having the cursor pressed on the canvas.


8. Curve fit: Available from within the Freehand Pen Options dropdown while the Freehand Pen Tool is selected. Value entered determines the accuracy to which bezier handles will be added to your freely drawn path. The higher the value, the more accurate your result will be. A value of between 0.5 and 10 pixels is required.


9. Magnetic: Available from the Options bar and within the Freehand Pen Options dropdown while the Freehand Pen Tool is selected. When selected, paths drawn will magnetize to pixels. The Magnetic settings as shown below, determine the width of the area the path is prepared to jump across, the contrast of the pixels necessary to attract the path and the frequency of anchor points added to the path.


10. Pen Pressure: Available from within the Freehand Pen Options dropdown while the Freehand Pen Tool is selected. When selected, the pressure applied to a graphics tablet (if youre using one) influences the pen width.


11. Auto Add/Delete: Available when the Pen Tool is selected; allows adding and removing of anchor points with the normal Pen Tool (see Secondary Mouse Controls).


12. Pathfinder Tools: These allow addition, subtraction, intersection and exclusion of the paths you create..

13. Layer Style: Available when Shape Layer is selected; this applies layer styles to shapes on a new layer (if chain link is unselected) or to shapes on the current layer (if chain link is selected)..


Other Shortcuts and Tips

  • (With path selected) Spacebar to give you access to the Hand tool. Move your screen without deselecting the path or changing tools.
  • Go to View > Snap To > Grid to allow precise creation of curves with the Pen Tool.


Best Practice Suggestions
  • Drag handles from the first anchor point when beginning a curved path.
  • Drag your handles around just one third of the curve youre creating for a smooth path.

- Position anchor points on a curve where the paths begin to change direction, not in the middle of its curve.


- Be sparing with your use of anchor points, fewer points = neater path

Finish!

Tutorial Made by Shaan Graphics.

Shaan Graphics is a premier Image Editing service provider, providing this exclusive clipping path and background removing service with Internationally lowest price guaranteed. Shaan Graphics Image editing service starts from $0.50 only.

Visit www.shaangraphics.com for more details

Wednesday, August 19, 2009

Tradexcel Graphics: Quick, Cost-effective Clipping Path and Image Solution for Online Retailer

Tradexcel Graphics Ltd (TGL) provides graphic solution for product image to online retailer from Bangladesh (located in Indian sub-continent). TGL delivers clipping path, background removing, drop shadow and some other photoshop services that are everyday necessities for online shops. Here finest quality meets the best affordable price within quickest turnaround time.

Our services are comparable to international standards. Therefore, our clients find us the handiest counterpart as an outsourcing co-worker for their online product image rather than recruiting an in-house team for the same. We provide a bunch of related image solution service under same servable umbrella.

Our main services include
# Clipping path: Cut object (product) from an image through its edge to pull out it for other necessary usages.

# Background removing: Drop down the background of a clipped image (product). It is very important to present a product very distinctively.

# Drop shadow/natural drop shadow: Artificially created shadow that gives the image (product) a three dimensional look. It helps to put depth of an image and makes it vibrant.

# Image resizing/cropping: To convert image into a newer size or resolution to make it optimized for website. Cropping also helps to give up the unnecessary part of the image and makes it lighter for web.

# Straightening: To rotate or change perspective of an image so that it can get a straight, vivid look. It is very important for product photography. Product should appear with a straight, attractive façade as if it has been speaking out for itself.

# Dust removing/retouching: Sometimes it is essential to remove dust or other unnecessary objects from an image to highlight the product in it. A spotless, pristine image helps selling.

# Renaming and Meta Tagging for Catalog: Photographs always named in a camera memory according to camera format. Everyday a large number of photos are being preserved in photographer’s or retailer’s archive. It is very difficult to find out an old photo from such store. Renaming and meta tagging are important for a user friendly online or offline archive or catalog.

100% Quality:
Clients, looking for an affordable service from any outsourcing provider, must appraise their quality on various parameters. Quality of a house largely depends on its expertise and experience. TGL has been working in this pitch since 2001. Our people work in a versatile team, consists of expert graphic designers and creative artists, for production and quality checking. We pick the best among the bests as our employee; we train him as a world class workman. We offer all related services through a single channel that literally means a total solution to our client. We give guarantee for a 100% quality that never decreases even to 99.99%. Client can attempt a free trial available in our website.

Cheap? Free? Or Cost-effective?:
Clients also looking for outsourcing to be benefited financially as these are significantly cheap. We promote cost-effectiveness rather than being cheap. Since ‘cheap’ hardly has devotion to quality, never we are able to appoint any top-notch people as a cheap workman regarding his or her salary. So let’s be cost-effective. We deliver quality clipping path and other service as a best output for our client’s business. So, we get paid from them. We save their cost of maintaining another department for these. It is noticeable that wages and other business cost in Indian sub-continent are many times lower than the European and North American job market. Thus we are in a advantage of having competency for a low cost but quality delivery. Moreover, here we extend their work our virtually for the reason that when they close their work at night, we start our hours of daylight. Thus we keep our clients working round the clock. Obviously intense and extensive work schedule leads to cost-effectiveness. We think almost all of us have some real-life experiences about the ‘hidden stuff’ inside free or cheap.

Generally we do clipping path or other image solution at 1$ to 15$ per image. But our prices are variable and negotiable depending on complexity and involvedness of the job.

Quick & On time:
Usually we are able to give an over-night delivery of a bulk amount of job. We settle it according to our client’s requisition and our commitment. As we have been serving for retailer websites or e-commerce sites that need on and on updates, we have a strong adherence to dead-line. We guarantee our clients will be tension-free about our timeliness. We are open 24/7 for with a consistent high-volume production line. So we need not make haste or compromise to the quality for a quick turnaround delivery.

Any Quantity, Easy Delivery, Convenient Mode of Payment: We are not worried about the quantity of your work. It is convenient but not must to order us for a bulk of work. We regard all volume in same consideration. Besides, we would like to keep a long term and regular business relationship with our clients. End of the day it contributes to our revenue significantly. So, we receive even a few images as an order. After a certain period we will work out the bill to be paid. We accept any mode of payment; any card, any online service for payment which is convenient to our client. TGL receives and delivers job online with the help of a high-speed internet connection, powerful server and FTP. It is stable because of own ISP and ceaseless power backup.

How to Start with TGL:
Visitor can easily come into our cordial touch through any means. We are available in all online channels 24 hours. Hence no time is odd time to us. We request clients to feel free for any enquiry for further clarification. Our professional customer service wing is welcoming to entertain our visitors with proper information all the time. We are waiting in following,-
Website


Contact Person: Dewan Shuvo

Cell: +1 408 740 5838
Email: shuvo@tradexcelgraphics.com

Skype: afountainpen
MSN: afountain@hotmail.com
GTalk: tradexcel.shuvo

Customer Service (24/7 Open)

Email: cs@tradexcelgraphics.com

Skype: tradexcel.cs
MSN: tradexcel.cs@hotmail.com
GTalk: tradexcel.cs

Wednesday, May 14, 2008

Combined use of Clipping Path and Photoshop Masking.

It was a little bit confusing. One holly day I tried to edit my own pictures so that I can show them to my friends. All I wanted to do was cutting my pictures from their original background in order to put them in another suitable background. There are so many different ways of background removing (from a picture or image) avail able in adobe Photoshop. Among them image masking or Photoshop masking and clipping path are the two commonly used method. My confusion was which technique I should apply.

Firstly I started with layer masking. It is a great and easy technique. But the problem I faced was with the edges. I could not cut the edges clearly. Then I tried with clipping path technique. Man! It is tough to manage pen tool. It requires lot of practice. So I tried with auto path. But here I had to face difficulties with my hair (On the picture off course). Next I tried with channel masking. Problem again! This technique is taking much longer time to adjust the levels or Curves.

What to do now? Probably people take advices in this kind of situations. I also did that. I talked with one of my colleague who works as a graphic designer (I am with business development team) in Color Experts International. It is a low-cost clipping path and image masking service provider. He showed me a method of using clipping path and channel masking together. He did this within 3 minutes. I was stunned. However I have learned that technique. Are you also interested to learn it? Keep an eye on the net. I will post it as a tutorial soon. Thank you every body.

Dewan Shuvo
Chief Operating Officer
Color Experts International.