The skin retouching is composed of three steps:


I put a new layer with 50% gray in Overlay mode, tick the checkbox “Fill with Overlay-neutral color”. 50 percent gray is almost the original value.


.jpg)
.jpg)
- First, the impurities of skin are removed.
- Second, balance the color differences of skin
- Third, the skin is smoothened, taking into account the natural skin pores.

In this tutorial I will show you, how skin retouching can result in silky-smooth skin with a fine pore structure.

1. Step: Remove skin blemishes
The patch tool and healing brush are ideal for touching up blemishes.
The Healing Brush tool works like the Clone Stamp. Choose areas with the Alt key and then as a source of focused areas of the skin can be processed. The difference is that Clone Stamp is to compensate for brightness, contrast, hue and saturation. Thus a source of healing brush forgives variations in color consistency of the goal area, etc.

The Patch tool is a hybrid of lasso tool and healing brush tool. A source is thereby selected by the tool, and then slid a better range in the selection.

Which tool is exactly what?
The Patch tool can quickly touch up the larger areas such as wrinkles. The repair tool is intuitive, because the pre-selected area is not necessary. This can edit more small and detailed parts of the image.
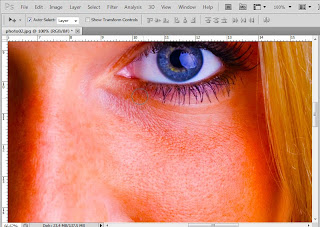
Whether you want to remove freckles from the picture, always depends on the client. For pure post-processing of photos for model / private, definitely consult with the person to lead, because track freckles, scars and moles also part of the external identity. Small bumps are no problem and can be removed safely. In this example, I show how the Healing brush is used to remove the small skin abnormalities.
With Alt I choose in the adjacent area of skin to be treated to provide a clean area. With a small, soft brush then I fix the impure skin. The spots disappear very quickly and easily.
So I go by the face and remove the disturbing elements.
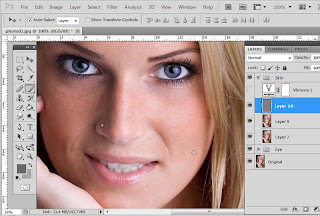
2. Skin colors converge
The skin may appear restless when isolated areas are darker or lighter than others. The balance, makes the skin look more vital and clean.
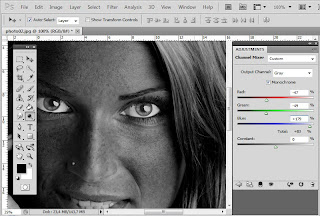
It would be ideal if I color skin irritations in the reinforcing effect, so I have a perfect measure for compensation. The quickest way is that I create a new adjustment layer – dynamics and move both controls (dynamics and saturation) to approximately + 80.
Dynamics adjustment layer is available in Photoshop CS4 only. In Photoshop CS5, it’s named as Vibrance. For previous versions, you can use Channel Mixer Adjustment Layer in Monochrome mode to get the same.
It all depends on the attitude of regulators such as the face is dark already. The darker face, the less I move the slider to the right.

Now I see clearly where there are imbalances in color.
I put a new layer with 50% gray in Overlay mode, tick the checkbox “Fill with Overlay-neutral color”. 50 percent gray is almost the original value.

Now pick a soft brush and very low opacity (5-15 percent). Choose dark gray as foreground color and light gray as a background color. You can quickly change the colors with X so that the skin offsets the shadows and highlights.
Quickly use the brush to remove all the skin freckles and adjusts the skin shadows and highlights as follows.

Right now, the following happens – you can see it in Normal mode:

Now, the dynamics(Vibrance) adjustment layer can then be deleted or deactivated.

The adjustment layer dynamics are there only in Photoshop CS4. Alternatively, to do this in previous versions of CS4, choose a channel mixer from the adjustment layer. Tick a monochrome and reduce the red and green channel and increase the blue channel. You will get a similar effect in black and white similar to the dynamics/Vibrance.

3. Making Smooth Skin while keeping the pores
3.1 – The classic: Blur and reduce opacity
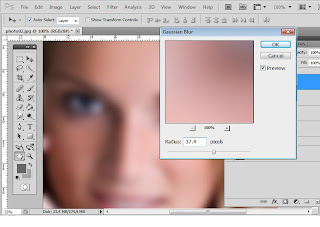
The Gaussian blur is there for a very long time in Photoshop, and it was so early for retouching purposes, particularly for smoothing skin. With this filter, a person can brush up on some easy way.
Press Ctrl + Shift + Alt + E, it will copy all the visible layer to a new layer and convert it into a Smart Object. Smart Object has the advantage that I can always change the degree of blur.
Now I choose menu Filter> Blur> Gaussian Blur.

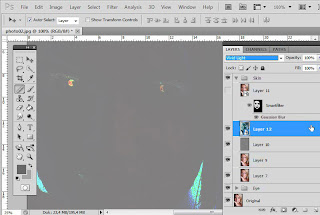
I fill the Smart Filter mask with black color, so that no area is covered by soft focus. Then I paint with a soft white brush that should be blurred with medium coverage from all parts of the skin . I save the edges of the image especially hair, eyes and mouth.

Thus I have softened the rough skin structures without changing the entire structure. Now I reduce the layer opacity to between 40 and 70 percent. By reducing the opacity of the layer, skin pores get back into the picture. If necessary I can customize filter for the smart blur .

The Gaussian blur of skin can definitely be used for smoothing. However, this process may result in loss of detailed information, stand out even at high resolutions. For a fine skin retouching, combination of other tools and filters is recommended.
3.2 – Blurring and sharpening
In the normal blur, reduce the opacity of the layer mask, the softness of the skin and the visibility of pores with a controller or in a balanced. The soft-colored skin, the less structures remain visible from the pores.
Another popular method combined with the skin smoothing is blur with a sharpening.
Ctrl + Alt + Shift + E to create a new layer merging all the visible layer.

Now I choose the mode to Vivid Light and inverse the layer content with Ctrl + I. Convert the layer into a smart object.

Now, as we have converted the layer into a smart object, we can adjust the values for high pass and blur filters any time, which we are going to apply now. And then we understand what happened or what was done in this level.
Now, choose a gaussian blur with value of 3-4 pixels, the pores now become visible again. Click OK to confirm.

Apply high-pass filter, 22 to 30 pixel radius to reinforce the edges of the image.

The high pass filter is often used for sharpening by the level of a 50-percent gray level, it sharpens the contours and used with Overlay mode with the existing image. Here, this effect is reversed. The high pass converts the image back from 50-percent gray in to normal view.

With the radius of the blur, I was able to smooth the rough skin structures within the specified radius, ie, adjust pixel radius, and the pores with the high-pass filter to work out.
.jpg)
The advantage of this technique over the classical softening is that I can do smoothing even to the highlight of the pores.
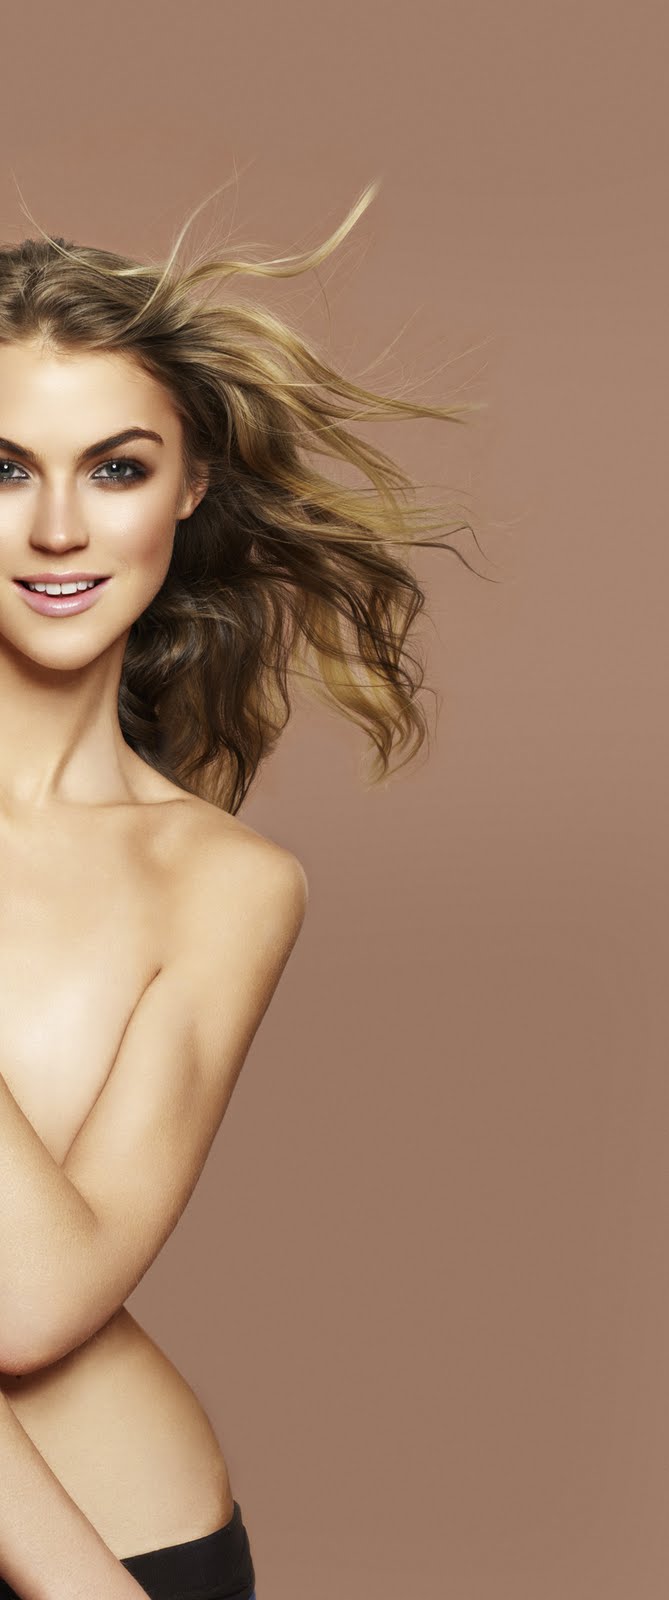
Before-after comparison of the skin retouching:
.jpg)
Shaan Graphics is a premier Image Editing service provider, providing this exclusive glamour retouching service with Internationally lowest price guaranteed. Shaan Graphics Image editing service starts from $0.50 only.