Monday, December 17, 2012
Realistic Portrait Retouching With Photoshop
Final Product What You'll Be Creating
Today’s designers and photographers need to have a varied skill set that sets them apart from the pack. One common skill that both can use is portrait photography retouching. This tutorial will make you a more effective retoucher and help keep your portraits looking clean and realistic. Subtlety is – going too far will only make the results noticeable. The best comment you can get after presenting a final image is "I didn’t even notice you did that". Let’s get started!
Step 1
Step 1 does not involve using a tool at all. Before you start retouching an image, you should open and evaluate the image and come up with a mental roadmap of what need be done. I’ve illustrated the steps necessary to retouch this portrait below.
The areas to retouch are:
1. Age spots, skin blemishes and other skin issues;
2. Forehead wrinkles;
3. Laugh lines and deep wrinkles;
4. Bags under eyes and crows feet;
5. Thinning eyebrows;
6. Stained teeth
Step 2
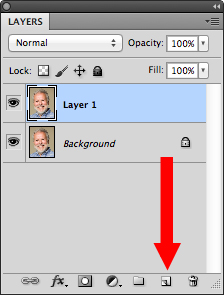
First, we need to work non-destructively. Duplicate the layer in the Layers Panel, by either dragging the background layer to the New Layer icon at the bottom of the Layer Panel, or by using the keyboard shortcut Command/Ctrl + J to duplicate the Layer Via Copy. This will give us "Layer 1". Double click the layer name and rename "Retouched". This will be the layer we will do all our retouching on, leaving the Background untouched.
Step 3
The first tool we will be using is the Spot Healing Tool shown in the Tool Bar below or with the tool shortcut "J".
The Spot Tool utilizes local texture and tone to blend over flawed areas in your image. There are several settings in the Options Bar at the top of your window. There are only two that we are going to need to focus on however. The first is the Brush Picker (1) and the Type (2).
First, Access the Brush Picker via the drop down arrow on the right side of the button. The only control we need to adjust in this window is the Hardness, which we will set it to 50%. 50% will blend the tool with the existing image better than 100%, which looks like a paper punch, but will not soften the brush too much. 0% will blend too much and diminish the effectiveness of the tool. Hit enter/return to exit the window – do not click off to the side to close the panel or you may accidentally affect your image. Next, make sure you are on "Proximity Match" for this portion of the tutorial.
We are now ready to start retouching the image. The Spot Tool is a brush-based tool and only needs to be slightly larger that the small flaws we are repairing. To adjust the brush size, use your bracket keys to change the size. Left bracket [ makes the brush smaller and right bracket ] makes it larger. (You can also adjust the hardness by adding the Shift key, but we want to keep this at 50%). Center your brush over your flaw, click and release. It should cover the flaw and blend in flawlessly. If it does not, make sure that your brush is properly sized and that you are not overlapping another texture, like hair or darker skin tones, etc.
Repeat this step until all skin small blemishes are removed. If you have larger areas (the vein on the cheek) leave those for now, and concentrate on smaller spots, freckles, moles, etc. Remember to adjust the brush using the bracket keys as you go. Keep it small – if you increase your brush size tool large, the tool will fail by mixing too much information and you will end up with a mess. No worries, there are tools designed for larger areas.
Step 4
After repairing the small spots, it’s time to move up to the larger flaws – forehead wrinkles, larger skin defects and laugh lines. To repair these areas, we will be using the Healing Brush Tool, which can be found under the Spot Healing Tool. Click and hold on the tool in the toolbar to access the additional healing tools. The Healing Brush tool repairs similar to the Spot Tool, but it splits the workload in two. Texture is now designated by the user (you) and tone is blended locally after you use the tool.
Once you select the tool, again access the Brush Picker in the Options Bar and make sure the Hardness is set to 50%. Make sure the "Align" option is checked to the right of the Options Bar. You can use the bracket key shortcut to change the size as needed.
We will start with the forehead wrinkles. Move your brush to a clean area of skin texture – usually you can find this between the wrinkles. We want to make sure that we have enough room to move and not run into other textures, like his hair or other wrinkles.
Hold down your Opt (Mac)/Alt (PC) key and click once to designate the texture source. Then take your tool and align the brush over the beginning of the wrinkle. Change your brush size to a size slightly wider the wrinkle. Click and hold, then brush across the flaw. Notice that your source icon is following your every move, offset based on your source. Try to paint in one mouse-click if possible, but if you notice that your source is getting close to another texture, you can release. When you release, the tool blends the tone locally making the new texture blend in with the existing surroundings. The "Align" feature will keep your source offset exactly where you designated it, until you choose another source. With each flaw, you should Opt/Alt-Click another source area and then paint over the flaw.
For the laugh lines, align the source slightly above the flaw and offset enough that you can paint over the entire wrinkle in one motion. Cover the initial wrinkle first, then blend the tone with additional strokes. Always be aware of your surroundings. If you get too large of a brush, you could accidentally blend in the lighter color of the mustache or other areas. Adjust your size as needed.
Step 5
The eyes present the biggest challenge on any portrait. Flaws are usually are so close to the eye and other areas (eyelashes, eyebrows, etc.) that using the Healing Brush is almost impossible given the size constraints. This is where the Patch Tool comes in. The third healing tool of the group, the Patch Tool is not brush based at all- it is selection based. Choose the Patch Tool under the Healing Brush Tool in the Tool Bar.
The only setting we have to check on this tool is that it is set to "Source" in the Options Bar.
Start by using the Patch tool to make a selection around the bag under the right eye. I like to dissect the eye wrinkles into sections. This gives me a more effective result than trying to select around the entire eye at one time.
Next click and drag the selection to a clean area of skin texture, like the forehead, and release. The new texture blends with the local tone and the wrinkle is gone. Repeat around the eye, selecting sections (left, right, top, bottom) individually and dragging the selection to a clean texture source.
Step 6
After you have the eyes completed, this is what the finished "Retouched" layer should look like:
But as you can see, this looks completely unrealistic. The trick is to use a Layer Mask to blend the original image back into the retouched layer.
Start by clicking the Layer Mask button at the bottom of the Layers Panel. This will give you a Layer Mask on the Retouched Layer.
Then, using the Eraser tool we will blend back in some of the flaws from the original image. Set your background color to Black (or hit "D" for default colors) and change your Eraser opacity to 33%. Make sure you are using a soft-edged brush (at least 50% Hardness).
Start by erasing over the laugh lines in one stroke. Choose a brush size that will encompass the flawed area. This will slowly bring back the flaw. I like to go over the entire wrinkle once, then on the second pass starting at the nose, I go halfway down the wrinkle giving it 66% coverage. Lastly I go right next to the nose on another pass making it 99%. This technique fades the wrinkle away as it moves further away from the nose. Repeat on the other side.
For the eyes, I use the same technique, but start at the corner of the eye closest to the nose and blend away from the nose. Remember to build slowly back into the area, we do not want to bring the entire flaw back at 100%. For the crows feet, I only went with one pass since they were so defined.
This is how the blended face looks after masking:
Step 7
After blending the face, I noticed that his eyebrows were pretty thin and I wanted to add some more definition back into that area. We can do this using a new process in Photoshop CS5 – Puppet Warp. First, make a selection around his beard using the lasso tool like so:
Next click on the Retouched layer icon in the Layers panel (deselecting the mask) and duplicate the selection onto a new layer using Command/Ctrl + J. Name the layer "Eyebrow". Move the image up to the eyebrow area and rotate to the approximate angle using Edit > Transform.
Next, go to Edit > Puppet Warp. This will create a mesh over your eyebrow. Click on the two ends of the eyebrow, dropping pins on the mesh. Click and drop a third pin in the middle of the eyebrow.
Click and drag the pins to warp the eyebrow to match the contour of the existing shape. And hit Enter/Return to accept the warp.
Finally, drop the opacity on the Eyebrow layer and using a soft eraser, blend the edges of the new eyebrow to the portrait. Repeat the steps for the other eyebrow.
Step 8
To whiten the teeth, simply make a rough selection using the lasso tool. Next, go to the Adjustments Panel and create a new Hue/Saturation Adjustment Layer.
Adjust the Saturation setting to the negative side, desaturating the yellow teeth. Do not go too far, you still want some color. Adjust brightness if needed. Do not adjust the Hue.
Final Image
Here is the final image. Wrinkles are nice and blended, new eyebrows for our friend and a whiter smile.
Shaan Graphics is a premier Image Editing service provider, providing this exclusive glamour retouching service with Internationally lowest price guaranteed. Shaan Graphics Image editing service starts from $0.50 only.
Posted by
Unknown
at
1:26 PM
![]()
Subscribe to:
Post Comments (Atom)


.jpg)


3 comments:
I have been running a blog within this same topic with regard to merely 2 years now, what I possess often thought is that it will take time to be able to conquer with this factor. But when I just read your post, I had been genuinely amazed that there are lots of ways to do it and have and even much better advantages. Photoshop Clipping path is best and low cost service please visit http://www.clippingpathsource.com/ for more information about clipping path.
Like your way of seeing things! Still you may do some things to expand on it. Thanks for sharing with us! Image editing company | Photo editing solutions in India
Wonderful Tutorial, thanks for putting this together! This is obviously one great post. Thanks for the valuable information. See more: clipping path service
Post a Comment